


How to Replace Tips on Lighten Up Trekking Poles: A Step-by-Step Guide
The tungsten carbide tips on your Lighten Up trekking poles are the crucial point of contact between you and the trail, providing essential traction on everything from rocky paths to slippery surfaces. Like tires on a car, they gradually wear down with use. Knowing how to properly replace them is a fundamental maintenance skill that will extend the life of your poles and ensure consistent performance on the trail. This comprehensive guide will walk you through the entire process, from identifying when replacement is needed to installing new tips securely.
Recommended trekking pole purchase link: https://s.click.aliexpress.com/e/_c4M7OWaN
When to Replace Your Trekking Pole Tips
Recognizing the signs of wear is the first step in proper maintenance. Replace your tips when:
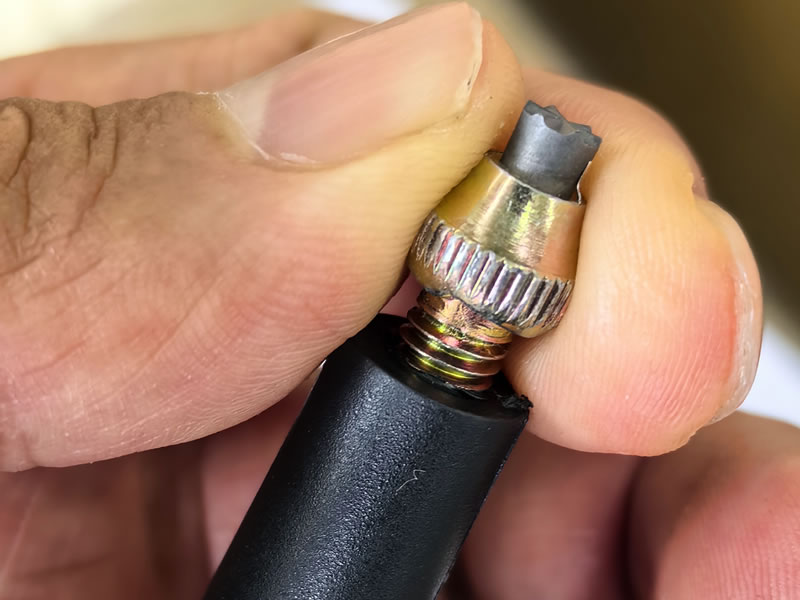
- The tungsten carbide insert is flush with or recessed below the surrounding metal collar. The carbide is the hard, gritty, silver-colored center, while the outer ring is typically brass or steel. When the carbide wears down completely, you lose the essential grip it provides.
- The tip is visibly cracked or chipped. Damage to the tip can compromise its structural integrity and traction capabilities.
- The tip is loose and wobbles, even after attempting to tighten it. A loose tip can be a safety hazard and indicates worn threads or a damaged tip.
Tools and Materials You'll Need
Gathering the right tools before you start will make the process smooth and efficient:
- Replacement Tips: Ensure you purchase the correct model-specific tips compatible with Lighten Up poles. Common thread sizes are M6 and M8.
- Adjustable Wrench or Pliers: For gripping and turning the old tip.
- Rubber Gloves or a Cloth: To improve grip and protect the pole's shaft from tool marks.
- Vise (Optional but Helpful): For securely holding the pole during removal.
- Wire Brush or Old Toothbrush: For cleaning the threaded socket.
- A Little Patience: Some tips can be stubborn, especially if they haven't been replaced in a long time.
Step-by-Step Replacement Guide
Step 1: Removing the Old Tip
- Secure the Pole: If you have a vise, gently clamp the pole shaft in a protected area (use soft jaws or a rag to prevent scratching). If not, hold the pole firmly between your knees or have a partner hold it steady.
- Grip and Turn: Put on your gloves or wrap the old tip with a cloth. Using your wrench or pliers, grip the worn tip firmly. Turn the tip counter-clockwise to loosen and unscrew it. It may require significant force if it's been secured with thread-locking compound or is corroded.
- Apply Steady Pressure: Avoid jerky movements. Apply steady, consistent pressure to break the tip free. If it's extremely stuck, you can try applying a penetrating lubricant like WD-40 to the threads and letting it sit for 10-15 minutes before trying again.
Step 2: Preparing for the New Tip
- Clean the Threads: Once the old tip is removed, use your wire brush or toothbrush to clean out the threaded socket on the pole. Remove any dirt, old thread locker, or debris. This ensures the new tip will screw in smoothly and sit flush.
- Inspect the Threads: Check the internal threads on the pole for any damage. If they are stripped, you may need to contact Lighten Up for a repair.
Step 3: Installing the New Tip
- Align the New Tip: Carefully align the new tip's threads with the socket on the pole.
- Hand-Tighten First: Screw the new tip in by hand as far as you can. This prevents cross-threading, which can damage both the tip and the pole.
- Final Tightening: Use your wrench or pliers (again, protected with a cloth) to tighten the tip clockwise. Tighten it firmly until it is snug, but be careful not to over-torque it, as this could strip the threads. A good rule of thumb is to tighten it a quarter to a half-turn after it becomes hand-tight.
Pro Tips and Troubleshooting
- Dealing with a Stuck Tip: If the tip is completely stuck and won't budge, you may need to carefully drill it out as a last resort. This is a risky procedure, so it's often better to contact Lighten Up's customer service for advice first.
- Thread-Locking Compound: For a more permanent hold and to prevent the tip from loosening during use, you can apply a small amount of medium-strength thread-locking compound (like Loctite Blue) to the threads before installing the new tip.
- Press-Fit Tips: Some older or specific models may have press-fit tips. For these, you typically need to pry the old tip out with a flat-head screwdriver and then firmly press the new one into place. Check your product manual to confirm your tip type.
Safety Check and Final Steps
Before heading back to the trail, perform a quick safety check:
- Ensure the new tip is secure and does not wobble.
- Re-attach the trekking basket if you use one.
- Give the pole a few test plants on a hard surface to confirm the tip is firmly attached.
Conclusion: Maintaining Your Connection to the Trail
Replacing the tips on your Lighten Up trekking poles is a simple yet vital piece of maintenance that restores performance and safety. By keeping fresh, sharp carbide tips on your poles, you ensure reliable traction that protects you from slips and falls. This straightforward process, requiring only basic tools and a few minutes of your time, can significantly extend the functional life of your poles, allowing you to confidently tackle many more miles of adventure. With this skill in your maintenance toolkit, your Lighten Up poles will continue to be a trusted companion on all your journeys.


