


How to Carry Walking Poles When Not in Use? A Comprehensive Guide for Hikers
There comes a point in nearly every hike when you no longer need your poles. Perhaps you've reached a flat, easy section where they feel redundant. Maybe you're about to scramble up a rocky section that requires hands‑free climbing. Or you've simply arrived at your destination and need to stow them for transport. Knowing how to carry your walking poles safely and conveniently is an essential skill that protects your gear, prevents injury to others, and ensures your poles are ready when you need them again. This guide covers every method—from backpack attachments to air travel—and helps you choose the right approach for your situation.
Recommended trekking pole purchase link: https://s.click.aliexpress.com/e/_c4M7OWaN
The Golden Rule: Secure and Protect
Before any carrying method, two universal principles apply:
- Collapse your poles to their shortest length. This reduces leverage, prevents accidental extension, and makes them easier to manage.
- Protect the tips. Sharp carbide tips can puncture packs, snag on gear, or injure others. Use rubber tip protectors or wrap tips in clothing.
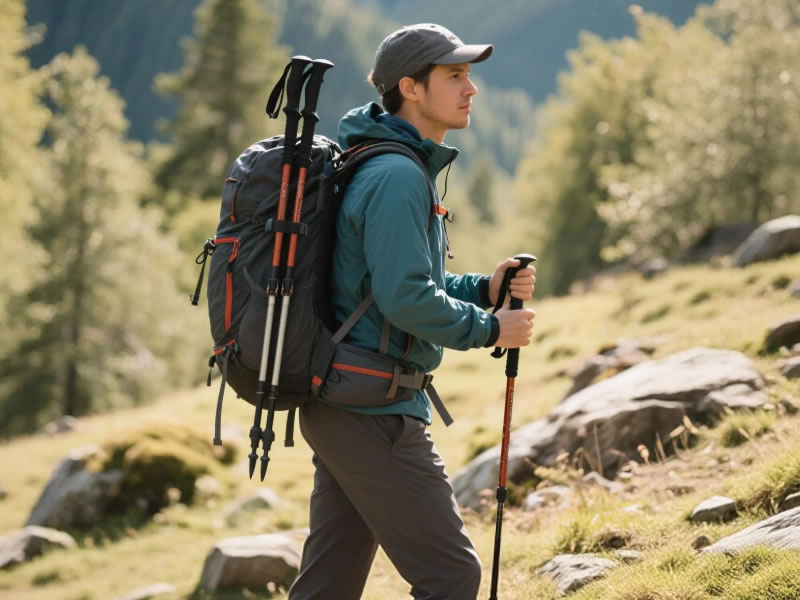
Part I: On‑Pack Carrying – The Standard for Hikers
Most backpacks offer multiple ways to attach poles externally. Choose the method that best suits your pack and preferences.
Method 1: Daisy Chain or Gear Loop Attachment
Many packs have daisy chains (webbing loops) on the front or shoulder straps.
- Collapse poles, secure with rubber tips.
- Slide the pole tips into a loop, allowing the handles to hang.
- Secure with a small cord or bungee if needed.
Best for: Quick temporary stowage; lightweight poles.
Method 2: Shock Cord / Bungee System
Some packs have built‑in shock cord (often on the front or side) designed for poles.
- Collapse poles.
- Slide them under the cord, tips pointing down.
- Ensure they are snug and won't slip out.
Best for: Secure, rattle‑free attachment; most common on technical packs.
Method 3: Dedicated Pole Attachment Loops
Many hiking backpacks feature specific loops for poles, often at the bottom or side.
- Collapse poles.
- Insert tips into the designated loop.
- Secure the handles with a compression strap or hook.
Best for: Clean, integrated carry; poles are out of the way.
Method 4: Side Compression Straps
Use the compression straps on the side of your pack to cinch poles against the pack body.
- Collapse poles.
- Position them vertically along the side of the pack.
- Tighten compression straps over them.
Best for: Packs without dedicated pole attachments; secure hold.
Method 5: Diagonal Carry (Across Back)
Some packs allow poles to be carried diagonally across the back panel.
- Collapse poles.
- Insert one tip into a bottom loop.
- Angle the poles across your back and secure the handles with a top strap or shock cord.
Best for: Even weight distribution; poles accessible from either side.
Part II: Temporary Carrying – When You Need Hands Free Briefly
Sometimes you just need to free your hands for a few minutes—to scramble over rocks, take a photo, or eat a snack.
One‑Pole Carry
- Hold both collapsed poles in one hand, gripping them near the handles.
- Let them hang naturally at your side.
- Not ideal for extended periods, but fine for short sections.
Under Arm Carry
- Tuck collapsed poles under one arm, tips pointing back.
- Secure with your elbow against your body.
- Keeps hands free for short periods.
Tuck into Waist Belt
- Some packs have waist belt pockets or webbing that can temporarily hold a collapsed pole.
- Insert tip into pocket, let handle rest against pack.
Part III: Air Travel – The Special Case
Flying with poles requires careful planning. Poles are never allowed in carry‑on luggage due to their potential as weapons. They must be checked.
Preparation
- Check airline policy – Some have specific rules for sporting equipment.
- Collapse poles fully and secure with rubber tip protectors.
- Use a protective tube – A cardboard mailing tube, PVC pipe, or dedicated pole travel case prevents damage and snagging.
- Pad with clothing inside your suitcase to prevent shifting.
- Remove baskets if they might catch on fabric.
Packing Options
- Inside checked suitcase: Place diagonally or along frame, pad well.
- Dedicated pole tube: Sturdy, protects poles, easy to pack in duffel.
- Strapped to outside of pack: Only if your pack is checked; ensure nothing can snag.
Pro tip: Carry spare tip protectors in case you lose the originals.
Part IV: Carrying Without a Pack
In Town / Travel
- Collapse poles, secure with rubber tips.
- Carry them in your hand like a walking stick.
- Use a small stuff sack to keep them together and protect clothing.
On Short Walks
- If you don't have a pack, simply carry collapsed poles in one hand.
- For longer periods, consider a simple shoulder strap (some poles include one).
Part V: Protecting Your Poles During Carry
- Rubber tip protectors – Essential for preventing punctures and snags.
- Connector straps – Some poles come with a small Velcro strap to hold the pair together when collapsed.
- Stuff sacks – A simple fabric bag keeps poles together and protects other gear.
- Separate compartments – If your pack has a dedicated pole pocket, use it.


