


Walking Poles for Steep Descents – Braking Techniques? A Complete Guide to Controlled Downhill Movement
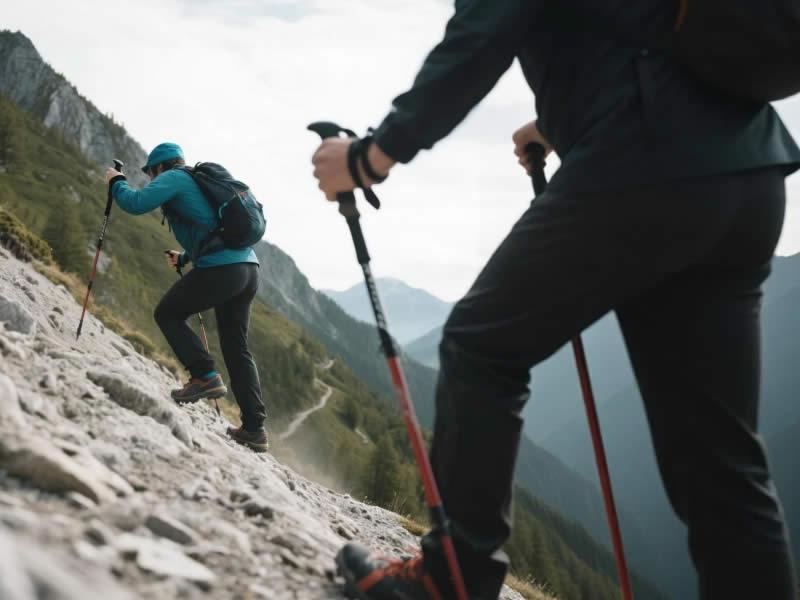
Steep descents are where walking poles prove their worth most dramatically. What feels like a knee-jarring, ankle-twisting plunge without poles becomes a controlled, confident descent with proper technique. The key is using your poles as brakes—transforming your arms into shock absorbers that protect your joints and keep you stable. This guide covers the essential techniques for safe, efficient steep descents.
Recommended trekking pole purchase link: https://s.click.aliexpress.com/e/_c4M7OWaN
The Short Answer
Yes, use your poles as brakes to control speed and protect knees.Lengthen poles 5-10cm beyond your normal flat-ground length to allow a wider, braced stance. Plant poles slightly ahead of your body, not beside your feet. Keep your weight slightly back, knees bent, and let the poles absorb impact as you step down. Move deliberately—one pole, one foot, other pole, other foot—maintaining three points of contact at all times. Use the straps correctly: hand up through the strap, grip lightly, so the strap takes the load. Avoid: planting poles too far forward (overreaching) or locking your elbows—both can send you off balance. Practice on moderate slopes first. Smooth, controlled descents are easier on your knees and safer for the trail ahead.
Why Steep Descents Challenge the Body
Understanding what happens to your body on steep descents explains why poles are so valuable:
Impact Forces: Each step on a steep descent subjects your knees to forces 3-5 times your body weight. Over a long descent, this cumulative impact can cause pain, inflammation, and long-term joint damage.
Quadriceps Fatigue: Your quads work constantly to brake your forward momentum. As they fatigue, control diminishes, and fall risk increases.
Balance Challenges: Your center of gravity shifts forward on descents, making you more prone to stumbling or falling.
Foot Placement Pressure: With each step, you're choosing where to place your foot under time pressure. Poor choices lead to twisted ankles or slips.
The Braking Technique Step by Step
1. Prepare Your Poles Before the Descent
Before you start down, adjust your poles:
- Lengthen by 5-10cm from your flat-ground setting
- Check locks: Ensure all sections are securely tightened
- Loosen straps slightly so they can slide if needed
- Remove baskets if they might catch on rocks (though this is less critical on descents)
2. Establish Your Stance
- Weight slightly back: Imagine sitting back into the hill. Your hips should be behind your ankles.
- Knees bent: Soften your knees to absorb shock. They should never be locked.
- Shoulders relaxed: Don't hike them up. Let your arms hang naturally.
3. Plant Your Poles
The planting pattern creates your braking system:
- Plant poles ahead of your body, not beside your feet
- Place them slightly wider than your shoulders for a stable base
- Angle poles back slightly so they're braced against the hill
- Test each plant before transferring weight—if it slips, adjust
4. The Movement Rhythm
- One pole forward, then opposite foot forward
- Then the other pole, then the other foot
- This creates a rhythmic "tripod" pattern with three points of contact at all times
5. Let the Poles Work
As you step down:
- Push down through the straps, not your grip
- Let the poles absorb your body weight gradually
- Your arms act as shock absorbers, transferring impact from your knees to your upper body
- If the descent is very steep, shorten your steps
Common Mistakes to Avoid
Planting Poles Too Far Forward
Reaching too far ahead overextends your arms, shifts your weight forward, and can cause you to topple. Poles should be planted just ahead of your forward foot, not at arm's length.
Locking Elbows
Straight, locked elbows transmit all impact directly to your shoulders and can't absorb shock. Keep a slight bend to maintain shock absorption.
Gripping Too Tightly
Death-gripping the handles creates tension throughout your upper body. Trust the straps to bear weight. Your hands should be relaxed.
Leaning Forward
Your instinct might be to lean into the hill, but this shifts your center of gravity forward, making you more prone to fall. Keep your weight slightly back.
Rushing
Steep descents demand patience. Rushing leads to poor foot placement, missed pole plants, and falls. Take your time. Each step is its own movement.
Advanced Techniques for Very Steep Terrain
The "Step-Down" Method
On extremely steep sections where a normal step is too long:
- Plant both poles firmly below you
- Lower yourself onto them, letting them take most of your weight
- Step down with both feet together (or one at a time) while poles support you
- This creates a controlled, almost rappelling motion
Side-Stepping
When the trail is too steep to face forward:
- Turn sideways to the hill
- Keep both poles on the downhill side
- Step down sideways, planting poles for each step
- Your hips face the hill, giving you better stability
Using One Pole for Support
If you need a free hand for scrambling:
- Keep one pole extended for braking
- Use the other hand to grip rocks or trees
- Move deliberately, maintaining three points of contact (two feet + pole, or foot + foot + hand)
The Role of Straps
Proper strap use is crucial for descents:
- Hand goes up through the strap from below
- The strap crosses the back of your hand, not your palm
- Grip lightly—the strap should bear weight
- Test the release: If you fall, can you pull your hand out instantly?
When to Remove Straps
In very steep, technical terrain where a fall could trap your hand, consider removing straps entirely. You'd rather drop a pole than have it drag you.
Knee Protection: The Real Goal
The braking technique isn't just about stability—it's about preserving your knees for years of hiking. Each well-executed pole plant diverts impact from your joints to your stronger upper body muscles. Over a long descent, this cumulative protection is priceless.
Practicing on Moderate Slopes
Before tackling serious descents:
- Find a moderate, forgiving slope (grassy hill or gentle trail)
- Practice the rhythm: pole, foot, pole, foot
- Focus on keeping weight back
- Build muscle memory so technique becomes automatic
What Experienced Hikers Say
"I used to dread steep descents," shares Michael, who hikes the Rockies. "My knees would ache for days. Learning to lengthen my poles and use them as brakes changed everything. Now I look forward to downhills. My knees thank me."
"The strap technique is the secret," says Sarah, a long-distance hiker. "When you let the straps bear your weight instead of your grip, you can relax your arms. Less tension, more control. It's like a different sport."
The Bottom Line
Steep descents are where walking poles prove their worth. Lengthen your poles, keep your weight back, plant ahead, and let the straps bear the load. Move deliberately, maintain three points of contact, and trust your poles to brake your momentum. With practice, what once felt like a jarring, knee-pounding plunge becomes a controlled, even graceful, descent.
Your knees will thank you for the technique—and for the miles you'll continue to enjoy.
Disclaimer: This article provides general guidance for walking pole techniques. Steep terrain is inherently risky. Always assess conditions, maintain appropriate fitness, and consider professional instruction for technical routes.


