


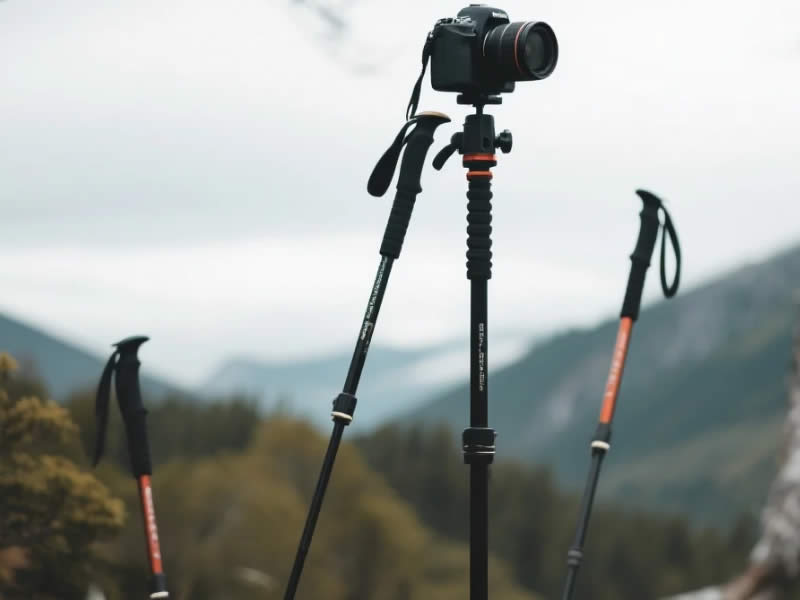
Can trekking poles be used for photography as a monopod?
For hiking photographers, every gram counts. Carrying a separate tripod or monopod can add significant weight and bulk. The good news: your trekking poles can double as a lightweight monopod, saving space and reducing pack weight. Here’s how to use them effectively, which models work best, and the limitations to keep in mind.
Recommended trekking pole purchase link: https://s.click.aliexpress.com/e/_c4M7OWaN
The short answer: yes, with the right accessory
Most trekking poles are not camera‑ready out of the box. However, many brands offer a removable grip that reveals a standard ¼‑20 screw mount – the same thread used on cameras and tripods. By replacing the original grip with a camera‑compatible grip or adding a small adapter, your pole becomes a sturdy monopod.
How it works
- Unscrew the top grip of your trekking pole. On compatible models (e.g., Leki, Black Diamond, Komperdell), the grip can be removed to expose a threaded post.
- Attach a camera adapter – either a dedicated grip with a built‑in screw (like Leki’s “Photo Kit”) or a simple ¼‑20 screw adapter that fits over the pole tip.
- Screw on your camera directly, or attach a small ball head for angle adjustment.
- Extend the pole to your desired height and lock it. Use it as a stable monopod for photos, videos, or even a lightweight spotting scope support.
Best trekking poles for photography use
- Leki with Photo Kit: Leki offers a specific “Photo Kit” (€30–40) that replaces the standard grip. It includes a padded grip with a ¼‑20 screw and a small ball head. Compatible with most Leki poles (e.g., Makalu, Cressida). This is the most polished solution.
- Black Diamond: Some Black Diamond poles have a removable top cap (e.g., Trail Pro, Distance Carbon Z). A third‑party adapter (e.g., “TrailPix”) or a simple ¼‑20 screw can be used. Black Diamond also sells a “Camera Adapter” for select models.
- Komperdell: Select Komperdell poles have a removable grip. Check the product specs for “camera ready” or “photo adapter.”
- Universal adapters: If your poles do not have a removable grip, you can use a clamp‑on monopod adapter (e.g., from Joby or Manfrotto) that attaches to the shaft. These are less elegant but work.
Advantages of using a trekking pole monopod
- Weight savings: A dedicated monopod weighs 300–500g. Using your pole adds just 30–50g (the adapter).
- Always available: You already carry the pole. No need to unpack a separate device.
- Quick deployment: Unscrew the grip, attach camera, shoot – takes 30 seconds.
- Stability: A trekking pole is stiff and adjustable, providing 2–3 stops of stabilization compared to handheld.
Limitations to consider
- Not a tripod: A monopod does not allow hands‑free long exposures or group shots. You still need a tripod for that.
- No pan/tilt head: Without a ball head, you can only aim by moving the whole pole. A small ball head (€15–30) solves this.
- Load capacity: Most poles support up to 2–3 kg, fine for mirrorless or DSLR with a light lens. Heavy telephoto lenses may exceed the pole’s or adapter’s limit.
- Wobble: A trekking pole is not as rigid as a dedicated monopod made of thick carbon tubes. For very long exposures (1+ second), you may still get some blur.
- Tip placement: The carbide tip can scratch rocks or floors. Use a rubber tip cover indoors or on delicate surfaces.
Step‑by‑step shooting technique
- Extend the pole to a comfortable height (usually eye level for standing shots).
- Attach the camera via the ball head or directly to the screw.
- Plant the pole tip firmly on the ground. On soft surfaces, use the basket to prevent sinking.
- Hold the pole with one hand on the grip (or on the shaft) and your camera with the other.
- Use a remote shutter release or the camera’s self‑timer to avoid shake.
- For video, keep the pole stationary and pan by moving your body.
Recommended accessories
- Leki Photo Kit: Includes grip, screw, and small ball head. ~€35.
- Small ball head: Any lightweight ball head with a ¼‑20 thread (e.g., Manfrotto 494, Ulanzi U‑60). ~€20.
- Rubber tip cover: To protect floors and reduce noise. ~€5.
- Quick‑release plate: Attach a plate to your camera for faster mounting.
When to use vs. when to bring a real tripod
- Use pole monopod for: Day hikes, fast movement, video panning, low‑light stills where 1–2 stops of stabilization help, and when weight is critical.
- Bring a tripod for: Long exposures (night, waterfalls), macro photography, group photos including yourself, and any situation requiring hands‑free operation.
Final verdict
Yes, trekking poles can be an excellent monopod for photography, saving weight and space. The best solution is a Leki pole with the Photo Kit, or any pole with a removable grip and a small ball head adapter. While not a replacement for a full tripod, a pole monopod is a versatile tool for the hiking photographer. Practice attaching your camera at home, and you’ll be ready to capture sharp images on the trail without extra gear.


