


How to fix a loose trekking pole locking mechanism?
Few things are as annoying – or as dangerous – as a trekking pole that slips under load. You plant it on a steep descent, lean your weight, and suddenly the section collapses. A loose locking mechanism isn't just an inconvenience; it's a safety hazard. Fortunately, most loose locks can be fixed in minutes with basic tools. This guide covers both flick‑lock (external cam) and twist‑lock (internal) systems, helping you diagnose and repair the problem before your next hike.
Recommended trekking pole purchase link: https://s.click.aliexpress.com/e/_c4M7OWaN
First, identify your lock type
Trekking poles use one of two main locking systems:
- Flick‑lock (or cam‑lock) : A plastic or metal lever that clamps the outer tube against the inner shaft. Found on most modern poles from Black Diamond, LEKI, Komperdell, and many budget brands.
- Twist‑lock (or rotating lock) : An internal expander that presses outward when you twist the sections. Common on older or budget poles.
The repair method is completely different for each. If you're unsure, look at your pole: if you see an external lever, it's a flick‑lock. If you see a smooth outer tube with no lever, it's a twist‑lock.
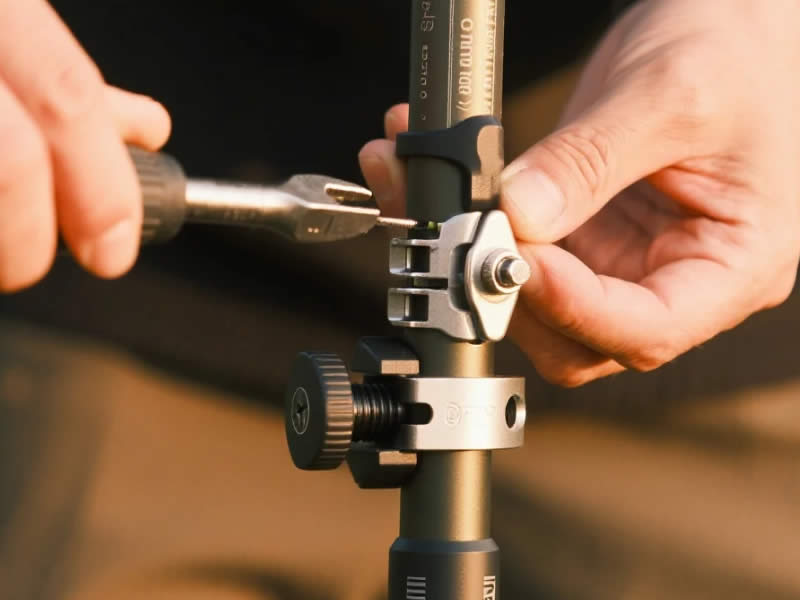
Fixing a loose flick‑lock mechanism
This is the most common and easiest repair.
Step 1: Locate the adjustment screw
On the side of the lever, there is a small screw (usually Phillips or hex). This screw connects the lever to the cam mechanism. Turning it changes the clamping pressure.
Step 2: Tighten the screw
- Open the lever to its fully unlocked position.
- Use a Phillips screwdriver (or the appropriate hex key – many poles include a tiny hex tool in the grip). Turn the screw clockwise by ¼ to ½ turn.
- Close the lever and test the grip. It should require firm hand pressure to close – about the same force as clicking a ballpoint pen. If it closes too easily, tighten more. If you can't close it at all, you've over‑tightened; back off slightly.
Step 3: Check for wear
If tightening the screw doesn't solve the problem, the cam or the plastic insert inside the lock may be worn. Look for:
- Cracked plastic cam – Replace the entire lock mechanism (brands sell repair kits).
- Worn metal cam – Rare, but if the lever flops without engaging, the cam teeth are stripped. Replace.
- Dirt in the mechanism – Mud packed behind the lever prevents full clamping. Pry out dirt with a toothpick.
Step 4: Clean the shaft
Sometimes the lock is fine, but the inner shaft is dirty or oily. A clean shaft is essential for grip.
- Extend the pole fully.
- Wipe the inner shaft with a cloth and rubbing alcohol to remove any grease or wax.
- Never lubricate the clamping zone – the lock needs friction.
Fixing a loose twist‑lock mechanism
Twist‑locks are more prone to failure and harder to repair.
Step 1: Disassemble the lock
- Unscrew the end cap at the bottom of the outer tube (some poles have a cap that pries off).
- Pull out the inner shaft. You'll see a plastic or rubber expander (usually a split cylinder or a cone with threads).
Step 2: Inspect the expander
Common problems:
- Expander is crushed or flattened – It no longer expands enough to grip. Replace it. Most brands sell replacement expanders (e.g., LEKI repair kit).
- Expander is dirty – Clean with soap and water. Dry thoroughly.
- Expander is the wrong size – If you've mixed sections from different poles, the expander may be too small.
Step 3: Clean and reassemble
- Clean the inside of the outer tube with a cloth wrapped around a dowel.
- Clean the inner shaft.
- Reassemble, ensuring the expander sits correctly. Some twist‑locks require you to twist the shaft while pushing to align threads.
Step 4: Adjust tension (if possible)
A few premium twist‑locks have an adjustment nut inside. Turn it clockwise to increase grip. Most budget twist‑locks are not adjustable – you simply replace the expander.
Preventing future looseness
- Don't over‑tighten flick‑locks – Extreme force can strip the threads or dent the inner shaft. Tighten just enough to prevent slipping under your body weight.
- Keep locks clean – Mud is the enemy. Rinse after muddy hikes.
- Replace worn parts – Flick‑lock cam mechanisms last 2–5 years of heavy use. Twist‑lock expanders last 1–2 years. Buy spares.
- Check before every hike – A quick squeeze of each lever reveals impending looseness.
When to replace the pole
If tightening or new parts don't fix the slip, the underlying issue may be:
- A dented inner shaft – The dent prevents uniform clamping. Straightening is not reliable. Replace the section or the pole.
- Worn anodized coating – The coating provides friction. Once worn smooth (shiny aluminum), the lock will always slip. Time for new poles.
- Cracked outer tube – The tube may have expanded under the lock. The pole is unsafe.
Quick reference table
| Problem | Likely cause | Fix |
|---|---|---|
| Flick‑lock lever closes too easily | Loose adjustment screw | Tighten screw ¼–½ turn |
| Flick‑lock slips even when tight | Worn cam or dirty shaft | Replace cam or clean shaft |
| Twist‑lock spins without gripping | Crushed expander | Replace expander |
| Twist‑lock works but slips under load | Dirt or oil on shaft | Clean with alcohol |
| Lever won't stay closed | Stripped cam threads | Replace lock mechanism |
Final thoughts
A loose locking mechanism is almost always fixable. For flick‑locks, the adjustment screw is your best friend – a quarter turn often restores perfect grip. For twist‑locks, replacement expanders are cheap and widely available. The key is to diagnose correctly and act before the slip causes a fall. Carry a small screwdriver or hex key in your repair kit; it weighs nothing and can save your hike. And remember: if you've tightened everything and the pole still slips, retire it. Your knees and wrists are worth more than the cost of new poles.


