


How to replace trekking pole wrist straps?
Wrist straps on trekking poles take a beating over time. Sunlight degrades nylon fibers; sweat rots the material; abrasion from rocks and branches frays the edges. A broken, frayed, or stretched-out strap isn’t just uncomfortable—it’s a safety hazard. When the strap fails on a steep descent or a stream crossing, you could lose the pole or lose your balance entirely.
Recommended trekking pole purchase link: https://s.click.aliexpress.com/e/_c4M7OWaN
The good news: replacing wrist straps is one of the simplest maintenance tasks on a trekking pole. With the right parts and a few minutes of patience, you can restore your poles to like-new condition. This guide covers everything—from figuring out which strap you need to step-by-step installation for every common attachment type.
When to replace your straps
Don’t wait until a strap snaps. Look for these warning signs:
- Visible fraying – Worn fibers along the edges indicate imminent failure.
- Stiff, cracked, or sticky material – UV damage and sweat rot degrade strap integrity.
- Buckles no longer hold adjustment – The strap constantly loosens during use.
- Padding is flat or missing – Comfort decreases and chafing increases.
- A strap has already broken – Replace both straps so they match in length and wear.
- Rodent damage – As one hiker discovered when a rodent made a meal of a LEKI strap, critters love chewing straps.-
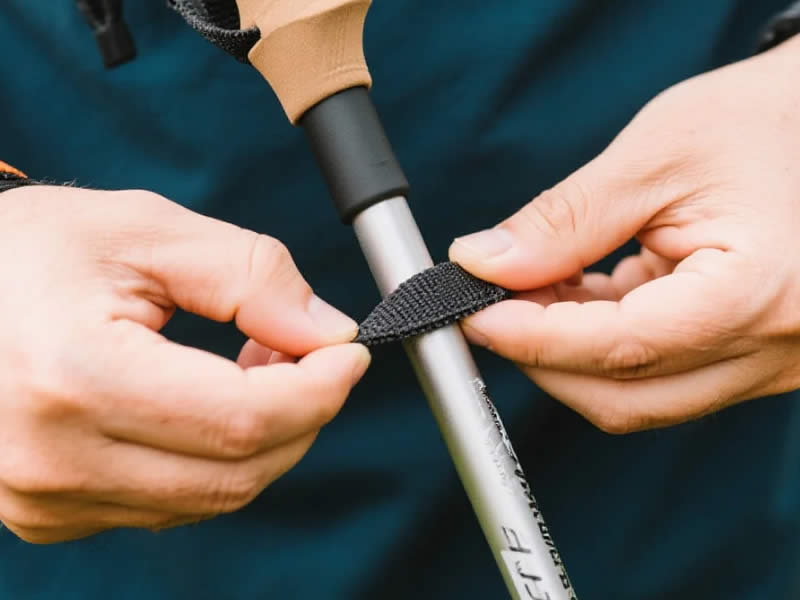
Step 1: Identify your strap attachment type
Trekking pole manufacturers use several different systems to attach straps to grips. The correct removal and installation method depends entirely on your system.
Type A: Pin or rivet (Black Diamond, many budget poles)
The strap is secured by a metal pin that runs through the grip and the strap loop. This is common on Black Diamond poles and many entry-level models. Removal requires driving out the pin with a punch or small screwdriver.-
Type B: Top screw or bolt (Gossamer Gear, some cottage brands)
A screw inside a circular cutout on top of the grip holds the strap in place. Removing the screw allows the strap to slide out.-
Type C: Friction-fit T‑nut
The strap loops around a T‑nut that is friction-fitted into a slot in the grip. To remove it, you pull or press the T‑nut out of its recess.
Type D: Quick‑release system (LEKI Trigger Shark, newer models)
LEKI’s Trigger Shark 2.0 system uses a magnetic or clip‑based quick‑release buckle. Straps detach without tools.-
Type E: Slip‑through slot (basic foam grips)
The strap simply threads through a slot in the grip, secured by a knot or stopper inside the foam. On some poles, the slot is accessible only after removing the grip—which may require boiling water to soften the adhesive.-
Type F: Slip‑on elastic loops
Some universal straps are designed to slide over the tip of the pole and wrap around the shaft below the grip. These require no disassembly but may not stay as secure under heavy load.-
Unsure which you have? Check the manufacturer’s website or contact customer support. Most brands list spare parts compatibility.
Step 2: Obtain the correct replacement straps
Best option: Brand‑specific straps. Black Diamond sells replacement straps directly.- LEKI offers multiple strap types, including the padded Lock Security Strap 2.0 and the Shark Frame Strap Mesh for Trigger Shark systems.- Komperdell’s straps are available through their service program.- Cascade Mountain Tech provides pole‑specific spare parts.- Silva also offers straps for all their poles.-
Universal straps: If brand straps are unavailable, universal adjustable straps exist. Expect to pay £8 to £15 per pair.- However, universal straps may not fit as securely as brand-specific ones. Look for padded straps at least 20mm wide where they contact your wrist—narrow straps create pressure points and discomfort.-
DIY alternative: For budget or temporary repairs, paracord works. Cut two 18‑inch lengths, melt the ends to prevent fraying, and thread through the attachment point.- This won’t match the comfort of padded straps but will keep poles connected to your wrists.
Step 3: Detailed installation guide by type
Type A – Pin or rivet (Black Diamond, similar)
Remove the old strap:
- Locate the small metal pin running through the grip near the top. It may have a slight directional taper.
- Use a small punch, a nail, or a thin screwdriver with a hammer. Tap gently until the pin protrudes.
- Pull the pin out with pliers. If the pin is stubborn, apply penetrating oil (WD‑40) and let it soak.-
- Remove the old strap.
Install the new strap:
- Thread the new strap loop into the hole, aligning it so the strap hangs naturally.
- Insert the pin from the same side it came out.
- Tap the pin flush with the grip using a hammer. The strap should hold firmly but rotate freely.
- Test by pulling—a properly seated pin will not slip.
Type B – Top screw (Gossamer Gear)
- Look for a circular cap or exposed screw hole at the top of the grip.
- Remove the screw with an appropriate screwdriver.
- Slide out the old strap.
- Position the new strap loop over the screw hole.
- Reinsert and tighten the screw. Do not overtighten—low torque is sufficient.
- Confirm the strap moves freely.
Type C – Friction‑fit T‑nut
- Locate the T‑nut within the grip’s slot. Pry it out carefully with a flathead screwdriver.
- Remove the old strap from the T‑nut.
- Thread the new strap through the T‑nut loop.
- Press the T‑nut back into the slot until it sits flush. The fit should be tight enough to prevent spinning—a spinning T‑nut will never hold adjustment.-
Type D – Quick‑release (LEKI Trigger Shark)
- Depress the release button or pull the magnetic connector apart—no tools required.-
- Slide the old strap off the pole.
- Attach the new strap by clicking it into place until you hear or feel a positive engagement.
- Confirm the strap is securely locked before use.
Type E – Slip‑through slot (foam grips)
If the slot is accessible without removing the grip: Feed the strap end through the slot, tie a stopper knot, and tuck the knot inside the slot. Ensure the knot cannot pull back through under load.
If the slot is sealed inside the grip: boil water, immerse the grip end for 2–3 minutes to soften the adhesive, pull the grip off with a gloved hand, replace the strap, and reattach the grip using contact cement or epoxy.-
Step 4: Proper strap adjustment and use
Replacing the strap is only half the job. Using it incorrectly defeats the purpose.
Proper threading technique
Always insert your hand through the strap from below. With your palm facing the handle, the strap should cross the back of your wrist just below the hand. The strap’s open end should point upward, forming a conical half‑twist shape with the apex at your wrist.-- This orientation locks your hand into the strap when you grip the handle.
Adjustment
Most straps use a sliding clip. Pull the free end to tighten; pull the tab to loosen. Attach first, then adjust so the strap sits snugly—not tight enough to cut circulation, but secure enough that the strap takes the load when you relax your grip. Never adjust with pliers or tools.
Why straps matter
Straps aren’t just anti‑drop leashes. A correct strap transfers load from your grip to your forearm, allowing you to relax hand muscles and reducing fatigue.- Without a functional strap, your fingers and palm bear all the force of planting and lifting—leading to early fatigue and blisters.
Step 5: When to install new grips instead
If the strap attachment point is damaged (cracked T‑nut seat, stripped screw, split foam), replacing only the strap won’t fix the problem. You may need a full grip replacement. Foam grips can be removed by boiling and replaced with aftermarket cork or EVA grips. Some aftermarket grips include their own straps.-
For integrated grip‑strap systems where the strap is molded into the grip material during manufacturing, replacement straps may not be available. In this case, a DIY paracord strap routed around the grip is the only option—or new poles.
Maintenance and prevention
New straps last longer with proper care:
- Hand‑wash with mild soap every few months. Nylon absorbs sweat and becomes stiff, abrasive, and odorous.
- Air‑dry completely before storage; moisture trapped in padding grows mold.
- Avoid bleach or fabric softeners—they break down strap fibers.
- Check stitching after every major trip. Loose threads should be re‑stitched or the strap replaced immediately.
- If a strap lasted 5,000 miles, as one LEKI user reported, you’re doing something right.-
Final thoughts
Replacing a worn or broken trekking pole wrist strap is one of the cheapest, easiest, and most impactful repairs you can make. It costs under $20 in most cases and takes 10 minutes with basic hand tools. A good strap transfers energy efficiently, reduces hand fatigue, and saves you from dropping a pole down a cliff face.
If you’re hesitating because the process looks complicated: start by identifying your attachment type. Then check the manufacturer’s website for spare parts and instructions. For LEKI and Black Diamond owners, replacement straps are readily available online. For everyone else, universal straps or a paracord DIY solution will get you back on the trail safely.
Your poles are only as good as the strap that connects them to your hand. Don’t trust your safety or your rhythm to frayed, rotten, or broken webbing. Replace those straps before your next hike—and feel the difference with every step.


