


How to use trekking poles to create shade for a resting break?
On exposed Brazilian trails—whether crossing the quartzite fields of Chapada Diamantina, hiking the coastal hills of Serra do Mar, or trekking through the cerrado—the sun can be relentless. Finding natural shade is not always possible. But your trekking poles, combined with a few lightweight items from your pack, can create a simple, effective shelter. Here’s how to turn your poles into a shade structure for a well‑earned rest.
Why you need portable shade
Direct sun exposure accelerates dehydration, causes heat exhaustion, and saps your energy. A 15‑minute break in the shade can lower your core temperature, reduce sweating, and improve mental focus. When no tree or rock provides cover, you must make your own. Trekking poles are the perfect frame because you already carry them.
Basic principle: poles as vertical supports
Any shade structure needs a frame to hold a fabric away from your body. Two trekking poles planted in the ground (or wedged between rocks) can support a rain jacket, emergency blanket, or lightweight tarp. The key is to angle the poles so the fabric faces the sun, creating a shadowed area underneath.
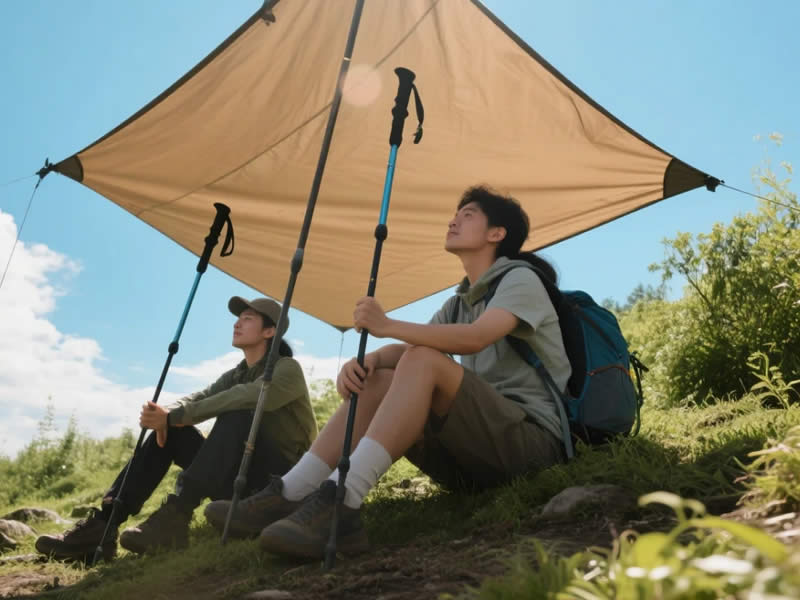
Method 1: The two‑pole lean‑to (easiest)
- Find a flat spot – Ideally with soft ground or rock crevices to hold pole tips.
- Extend both poles to their maximum length (or slightly longer). Remove baskets if fitted – they are unnecessary.
- Plant the poles about 1.5‑2 metres apart, angled slightly away from the sun. The tips should dig into the ground or wedge against rocks.
- Drape a fabric – A rain jacket (unzipped), a space blanket (reflective side down), or a lightweight emergency tarp. Lay it over the two poles so it slopes down to the ground on the sunny side.
- Secure the edges – Place rocks, shoes, or your backpack on the lower edges to prevent wind from lifting the fabric. If using a jacket, hook the hood over one pole tip.
- Crawl underneath – Lie or sit in the shadow. The angled fabric blocks direct sun while allowing some airflow.
Method 2: The single‑pole hammock shade (for solo hikers with one pole)
If you only have one pole or the ground is too hard to plant two:
- Find a rock or tree – One vertical support (a boulder, a stump, or a trekking pole) and a second anchor point.
- Extend the pole to its maximum length. Lean it against the rock, with the tip on the ground and the handle resting on the rock’s top. Alternatively, wedge the pole between two close rocks.
- Drape your jacket or a piece of cloth over the pole and the rock, creating a small triangular shade.
- Secure the bottom corners with your backpack or rocks. This creates a tiny shadow just large enough for your head and torso – perfect for a quick water break.
Method 3: The tripod shade (most stable)
For windy conditions:
- Take three poles – If you are hiking with a partner, use both your poles and one of theirs, or use two poles and a sturdy stick.
- Lash the tops together – Use a shoelace, paracord, or a spare strap. Tie them about 20‑30 cm from the top, forming a tripod.
- Spread the legs – Position the tripod so one leg faces the sun, creating a slanted shadow.
- Drape the fabric over the frame. Because the tripod is self‑standing, you do not need to plant tips deeply – just place them on the ground.
- Crawl inside – The tripod offers 360° shade if you cover all sides, but for a simple break, cover only the sunny side.
What fabrics work best
- Rain jacket – Most hikers carry one. Unzip it fully and spread it like a blanket. The hood can hook over a pole tip. Downside: you may need the jacket later if it rains; keep it dry.
- Emergency space blanket – Weighs 50‑100 g, reflects sunlight and heat. The shiny side should face the sun. Very effective but crinkly and can tear.
- Lightweight tarp or poncho – Ideal if you carry one. More durable than a space blanket.
- Sun umbrella – Some hikers bring a compact umbrella; you can lash it to a pole for instant shade, but the pole method already uses your existing gear.
Choosing the right spot
- Firm ground – If the soil is soft, the pole tips will sink. That is fine – it makes them more stable. If the ground is hard rock, lean the poles against a rock or wedge them into a crack.
- Wind direction – Face the fabric into the wind to prevent flapping. If the wind is strong, lower the structure (shorten poles) and use more rocks as anchors.
- Sun angle – The lower the sun, the longer the shadow. At midday, the shade will be directly under the fabric; in the late afternoon, the shadow extends to one side. Adjust pole angle accordingly.
Tips for Brazilian conditions
- Heat and humidity – In the Amazon or Atlantic Forest, shade alone is not enough – you also need airflow. Do not seal the fabric to the ground; leave a gap at the bottom for breeze.
- Muddy ground – If the ground is wet, use your pack or a plastic bag as a sitting mat. The shade structure still works.
- Ants and insects – Check the ground before sitting. Brush away leaf litter where ants may nest.
- Quick setup – Practice at home so you can erect shade in under 2 minutes. On a hot trail, speed matters.
Breaking down and packing
After your break, shake off any dirt, fold your fabric, collapse the poles, and stow everything. If you used a space blanket, fold it carefully – it is fragile. If you used a rain jacket, air it out before packing to avoid mildew.
Final thoughts
Your trekking poles are multi‑tools. Beyond walking support, they can become the frame for an instant shade shelter. With a rain jacket or a space blanket, you can create a cool, protected microclimate anywhere – even on Brazil’s most exposed trails. This simple skill reduces heat stress, allows longer rests, and makes your adventure safer and more comfortable. Next time the sun beats down and no tree is in sight, remember: your poles are the pillars of your personal oasis.


