


How to use trekking poles for descending steep grassy slopes after rain?
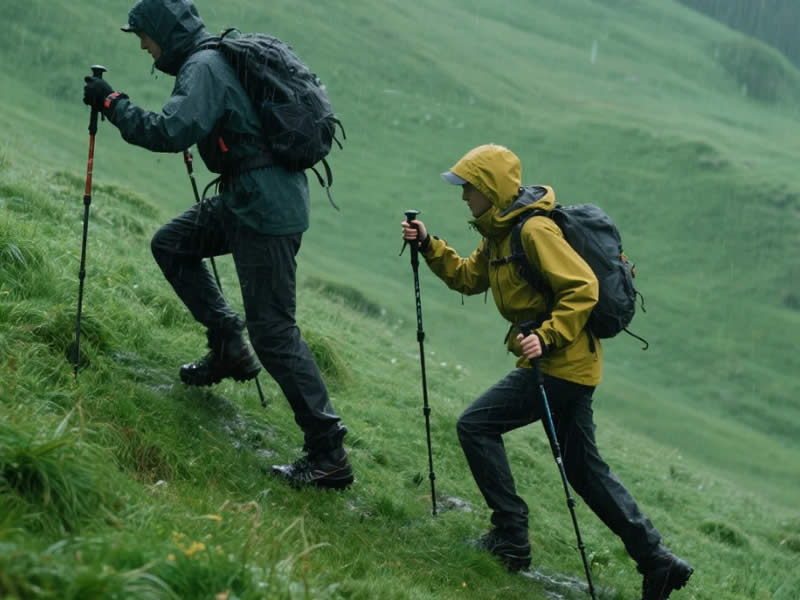
On wet, steep grassy slopes, use your trekking poles as brakes and stabilisers. Lengthen them by 5–10 cm, plant the tips firmly ahead of your feet, and push down through the straps to slow your descent. Take short, deliberate steps, keeping your weight slightly back (lean into the hill). Use a double plant on very steep sections – plant both poles together, push down, and move one foot at a time. Test the ground before each step – wet grass over hard ground is especially slippery. Avoid planting on moss or algae – they offer no grip. The carbide tip grips the grass surface; rubber tips slide dangerously – remove them completely. On the most slippery sections, consider traversing diagonally rather than descending straight down. Good footwear with an aggressive tread is essential – poles are a support aid, not a substitute for proper grip. This article explains the technique in detail, including setup, rhythm, and safety considerations.
1. The challenge of wet grassy slopes
Wet grass is one of the most slippery surfaces a walker can encounter. The combination of water, blade orientation, and a hard underlying surface creates a low‑friction environment, particularly on steep slopes. A misstep can result in a rapid slide, often with little warning. The primary risk is a fall that can lead to injury, especially on the steep, grassy slopes common in the Lake District, Snowdonia, and the Scottish Highlands.
2. Equipment preparation
Before you even start the descent, ensure your equipment is set up correctly:
a. Pole length – Lengthen your poles by 5–10 cm compared to your flat‑ground setting. This allows you to plant the pole ahead of your feet, creating a braking effect. On very steep slopes, you may lengthen them further.
b. Tip type – Use bare carbide tips. Rubber ferrules (tip protectors) have no grip on wet grass – they slide. Remove them before you start the descent.
c. Baskets – A small mud basket can help prevent the pole from sinking into soft ground, but on grassy slopes, they are not necessary and may catch on grass. Remove them if you find them snagging.
d. Locking – Ensure your lever locks or twist locks are fully tightened. On steep, wet ground, a slipping pole can be dangerous.
e. Footwear – Poles are not a substitute for good footwear. Wear boots with an aggressive tread (e.g., Vibram or similar) that can bite into the grass surface. Soft, worn soles are a hazard.
3. The core technique
a. Plant ahead – Plant the pole tip about 20–30 cm ahead of your front foot, at a slight angle. The pole should be angled forward, with the tip below the grip. This creates a braking effect as you step forward.
b. Push down through the strap – The load should go through your wrist strap, not your grip. Your hand should be relaxed. Push down firmly to increase the friction between the tip and the grass surface.
c. Short steps – Take short, deliberate steps. On steep, wet grass, a long step increases the risk of a slip. Keep your feet close to the ground.
d. Lean back – Keep your weight slightly back, leaning into the hill. This reduces the risk of your feet sliding forward. Your torso should be upright or slightly leaning back, not leaning forward.
e. Double plant on steep sections – On very steep sections, use a double plant: plant both poles together ahead of your feet, push down, and move one foot at a time. This gives you maximum stability and braking.
4. The "traverse" technique
On very steep, long, or slippery slopes, consider descending diagonally (traversing) rather than straight down.
- Approach – Descend at a 30–45° angle to the slope, stepping sideways and down.
- Poles – Plant the uphill pole (the one on the slope side) as a brake, and use the downhill pole for balance.
- Why it works – A diagonal descent reduces the force of gravity acting directly down the slope, making each step less prone to sliding. It also allows you to use the uphill pole more effectively as a brake.
5. Testing the ground
Before each step, tap the ground with your pole tip:
- Firm ground – If the pole tip stops firmly, the surface is likely solid.
- Sinking – If the tip sinks, the ground is soft – you may sink, but the pole will provide support.
- Sliding – If the tip skids on the grass, the surface is very slippery – consider a different line.
6. Rhythm and pacing
- Slow and steady – Rushing on wet grass is a recipe for a fall. Move at a slow, controlled pace.
- Alternating or double plant – On moderate slopes, use the standard alternating rhythm (left pole with right foot). On very steep sections, switch to the double plant.
- No sudden movements – Avoid sudden changes in direction or speed. Keep your movement smooth and controlled.
7. Common mistakes to avoid
- Using rubber tips – A frequent and dangerous error. Rubber ferrules have no grip on wet grass and should be removed.
- Planting too far ahead – Overreaching can cause you to lose balance if the pole slips. Plant close to your feet.
- Leaning forward – Leaning forward shifts your weight onto your front foot, increasing the risk of a slide. Keep your weight back.
- Ignoring the warning signs – If you feel your feet starting to slide, stop, plant your poles firmly, and reassess the descent.
- Not using the double plant – On very steep sections, the alternating rhythm may not provide enough braking. Switch to the double plant.
8. What to do if you start to slide
If you feel your feet starting to slide:
- Plant both poles firmly – Push down hard through the straps to create a braking effect.
- Sit back – If you are losing balance, sit back on your heels. This is safer than falling forward.
- Stay calm – Panic increases the risk of a fall. Keep your weight back and move slowly.
9. Equipment after the descent
After the descent, check your poles:
- Tips – The carbide tips may have picked up grass or mud. Wipe them clean.
- Locks – Check your lever locks for any moisture. Dry them if necessary.
- Shaft – Inspect the shaft for any damage from planting on rough ground.
10. Final verdict
Descending steep, wet grassy slopes is a challenge that requires caution, correct technique, and the right equipment. Lengthen your poles, remove rubber tips, plant ahead, and push down through the straps. Take short steps, keep your weight back, and use a double plant on very steep sections. On the most slippery slopes, descend diagonally. Good footwear is essential. With the right approach, you can descend these slopes safely and without injury, making your walk in the hills a more enjoyable experience.


