


How to use trekking poles on technical rocky sections in the Brecon Beacons?
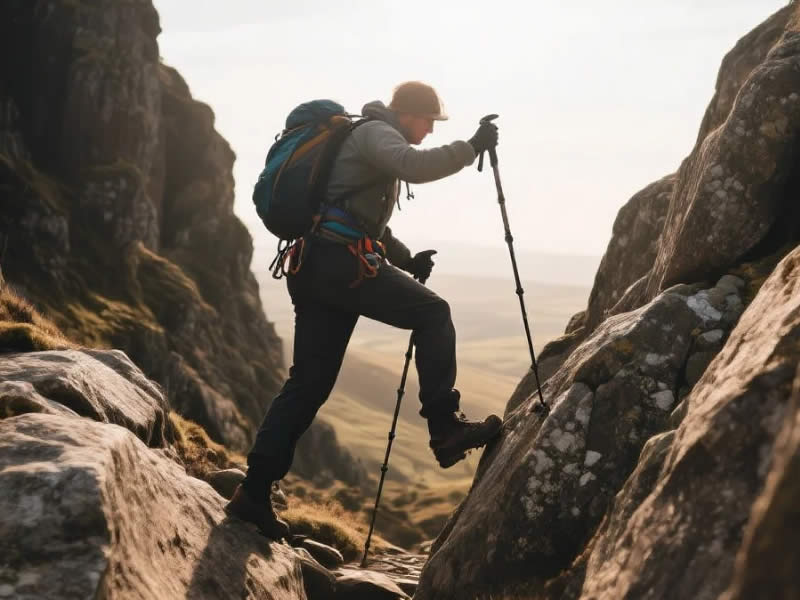
For technical rocky sections in the Brecon Beacons—such as the steep, loose descents on Pen y Fan, the rocky spine of Corn Du, or the boulder fields on Cribyn—use your trekking poles as balance aids, not climbing tools. They are there to stabilise you, not to pull you up. Shorten your poles by 5 cm to keep your centre of gravity lower and improve your balance on uneven ground. Plant the carbide tip on flat, stable rock—avoid crevices where the tip could jam or snap. Use one pole at a time on technical ground, keeping your other hand free to touch the rock if you need extra stability. On very steep or exposed sections, collapse and stow your poles completely and use your hands for scrambling. For wet rock, remove rubber tips—carbide grips better directly on wet stone. Always test each plant before committing your weight. Practice on easier rocky sections before tackling the more exposed routes. Here is a detailed guide to using trekking poles safely and effectively on the Brecon Beacons' rocky terrain.
1. Understanding the Brecon Beacons' rocky terrain
The Brecon Beacons are not the steepest mountains in the UK, but they have their share of technical rocky sections. Key routes include:
- Pen y Fan – The most popular summit. The descent from the summit on the steep, grassy/rocky slopes can be slippery, especially in wet weather.
- Corn Du – The neighbouring peak has a rocky ridge line with exposed sections.
- Cribyn – The ridge between Cribyn and Pen y Fan has rocky outcrops and loose scree.
- Boulder fields – On some routes, you may encounter large, unstable boulders that require careful foot placement.
These sections can be challenging, especially in wet conditions. The rock is often hard, sharp, and abrasive—a slip can cause injury.
2. Preparing your poles for rocky sections
a. Shorten your poles – Reduce your pole length by about 5 cm compared to your flat‑ground setting. A shorter pole lowers your centre of gravity, improving your balance on uneven ground. It also reduces the risk of the pole catching on rocks.
b. Check the tips – Use sharp carbide tips. Worn tips will slip on rock. Replace them before a technical walk.
c. Remove rubber tips – Rubber ferrules have no grip on wet rock. Remove them before you enter the rocky section.
d. Remove baskets – Small baskets can catch on rocks. Remove them on technical terrain.
e. Check your locks – On rocky ground, you will be putting lateral force on your poles. Ensure your lever locks or twist locks are fully tightened. Loose locks can slip, causing you to lose balance.
3. Technique on technical rocky sections
a. Use one pole, not two – On narrow or exposed rocky sections, it is often safer to use one pole, leaving your other hand free to touch the rock for balance. This is particularly important on scrambles where you need to use your hands.
b. Plant on flat rock – Plant the tip on a flat, stable part of the rock, not on sloping surfaces or in crevices. A tip in a crevice can get wedged, and pulling it out can bend or snap the pole.
c. Test before committing – Before putting your weight on the pole, test the plant with a firm push. If the tip slips, find a better planting spot.
d. Plant vertically – On rock, a vertical plant is more stable than an angled one. It gives you a solid anchor point.
e. Short, deliberate steps – On rocky ground, avoid long strides. Take short, controlled steps, planting your pole with each step.
f. When to stow poles – On steep, exposed sections where you need both hands for scrambling, collapse your poles and stow them on your pack. You can secure them with the side compression straps or front bungees. Ensure they are fastened securely – a loose pole on a scramble can be a hazard.
4. Common mistakes on rocky sections
- Planting in crevices – This is the most common cause of pole damage on rock. A tip wedged in a crevice can bend or snap the pole.
- Using two poles on narrow sections – Two poles on a narrow ridge can be cumbersome and get in the way of your foot placement.
- Not shortening poles – A longer pole on rock raises your centre of gravity, reducing stability. Shorten before you start the rocky section.
- Rushing – Rocky ground requires patience. Rushing increases the risk of a fall.
- Ignoring loose rock – Test each rock before committing your weight. Loose rock can shift unexpectedly.
5. Descending rocky sections
Descending rocky ground is often harder than ascending. On descents:
- Lengthen poles slightly – On a rocky descent, lengthen your poles by 2–3 cm (but still shorter than your flat length). This allows you to plant ahead for braking.
- Plant ahead – Plant the pole ahead of your feet to create a braking effect.
- Double plant on steep sections – On very steep rocky descents, use a double plant for maximum stability.
- Keep your weight back – Lean slightly back, keeping your weight over your heels, to reduce the risk of slipping forward.
6. Equipment considerations for rock
- 7075 aluminium – Aluminium is safer on rocky ground than carbon, which can splinter on impact.
- Lever locks – Lever locks are more reliable on rocky terrain than twist locks. The vibration and impact can loosen twist locks.
- Replaceable tips – The abrasive rock will wear down tips. Carry spares.
7. Practice on easier sections
Before tackling the most technical sections, practice your technique on easier rocky ground. Get used to the feel of planting on rock, shortening your poles, and using one pole at a time. This builds confidence for the more exposed sections.
8. Safety considerations
- Helmet – On exposed routes, consider wearing a helmet. A dislodged stone or a fall on rock can cause serious head injury.
- Footwear – Wear boots with a stiff sole and a good tread. Poles are not a substitute for proper footwear.
- Weather – Wet rock is more slippery than dry rock. In wet conditions, consider whether the route is safe.
9. Final verdict
On technical rocky sections in the Brecon Beacons, use your poles as balance aids, not climbing tools. Shorten them by 5 cm, plant on flat, stable rock, and use one pole at a time to keep a hand free. On steep, exposed sections, stow your poles completely. Remove rubber tips and baskets. Test each plant before committing your weight. With the right technique, your poles will improve your stability and confidence on rocky ground, making your walk safer and more enjoyable. Practice on easier sections first, and always respect the conditions.


