


Trekking pole techniques for beginners
Stepping into the world of hiking with a pair of trekking poles can feel awkward at first. Many beginners wonder, "Am I even doing this right?" You’ve made a smart choice—these simple tools are powerful allies on the trail, but their benefits are only fully realized with proper technique. This guide will transform you from a unsure novice into a confident hiker, unlocking the stability, efficiency, and joint protection that trekking poles promise.
Recommended trekking pole purchase link: https://s.click.aliexpress.com/e/_c4M7OWaN
Mastering a few fundamental skills will make your hiking safer, more enjoyable, and less taxing on your body.
First Steps: Dialing in Your Setup
Before you take a single step, correct setup is crucial.
- Find the Right Length: On flat, even ground, stand upright and hold the pole with your elbow bent at a 90-degree angle. This is your baseline length. Most modern poles have easily adjustable levers or twist locks to achieve this.
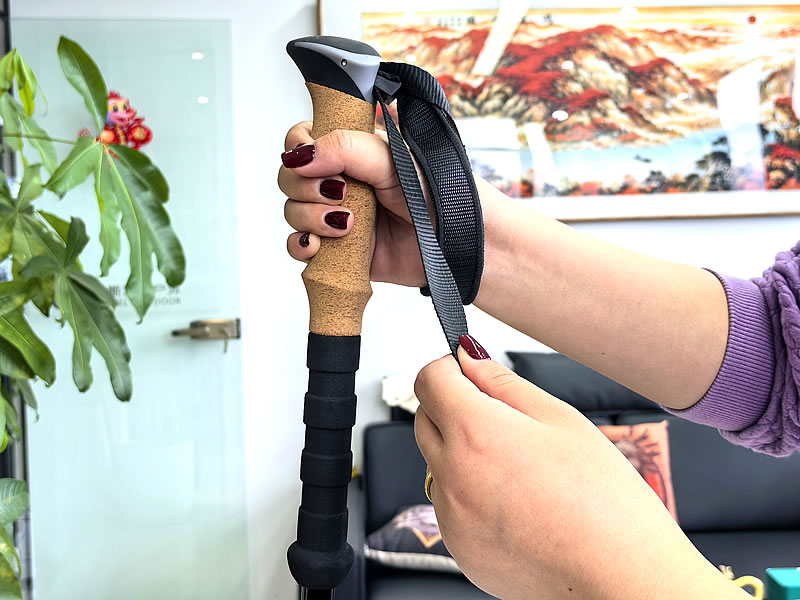
- Use the Wrist Straps Correctly: This is a common beginner mistake. Do not simply grip the handle through the strap. Instead, slide your hand up through the strap from below, then grip the handle. The strap should rest between your thumb and index finger, distributing weight along your wrist and palm. This allows you to apply pressure without a death grip, saving hand fatigue.
Mastering the Basic Walking Rhythm
The core technique is about creating a natural, rhythmic motion.
- The Opposite Arm/Leg Rule: The most fundamental pattern is to plant your trekking pole in sync with your opposite foot. As your left foot steps forward, your right pole should swing forward and plant on the ground. This creates a stable, natural cadence that improves balance and propels you forward efficiently. Think of it as a four-wheel-drive system for your body.
Adapting to the Terrain
A fixed pole length won't work for every slope. Learning to adjust is key to advanced technique.
- Uphill: Shorten your poles. On a steep incline, shorter poles will prevent you from overreaching and straining your shoulders and wrists. It allows for a more powerful push-off that helps drive you upward.
- Downhill: Lengthen your poles. Extending your poles by 5-10 cm (2-4 inches) for a descent allows you to plant them further down the slope. This acts as a brake, reduces the jarring impact on your knees, and keeps your torso upright for better balance.
Pro Tips and Common Beginner Mistakes to Avoid
- Don't Stab the Ground: Plant the pole tip smoothly and deliberately, close to your body. A aggressive, wide stabbing motion wastes energy and can throw you off balance.
- Use the Basket: The small plastic discs near the tip are called baskets. For most trail hiking, keep the small baskets on. They prevent the poles from sinking too deeply into soft ground, mud, or snow.
- Look Ahead: Plant your pole where you will take your next step, not where your foot currently is. This proactive planting ensures continuous stability.
- Relax Your Grip: Maintain a firm but relaxed grip. Periodically change your hand position on the grip to prevent fatigue and blisters.
By practicing these core techniques, your trekking poles will quickly feel like a natural extension of your body. They will build your confidence, protect your joints, and open the door to tackling longer and more challenging trails with greater ease and enjoyment.


