


How to Use Hiking Poles to Test Water Depth or Ground Stability?
Venturing into unknown terrain, whether it's a murky stream crossing or a suspiciously soft patch of trail, requires caution. Your trekking poles are more than just walking aids; they are invaluable sensory tools that act as remote probes, extending your reach and providing critical information before you commit your weight. Mastering the art of testing with poles can prevent falls, submerged boots, and even serious injury.
Recommended trekking pole purchase link: https://s.click.aliexpress.com/e/_c4M7OWaN
The Core Principle: The Pole as a Sensory Probe
Think of your pole as an extension of your arm. Its job is to gather tactile and auditory feedback, transmitting information about what lies beneath the surface back to you. This requires deliberate technique and interpretation.
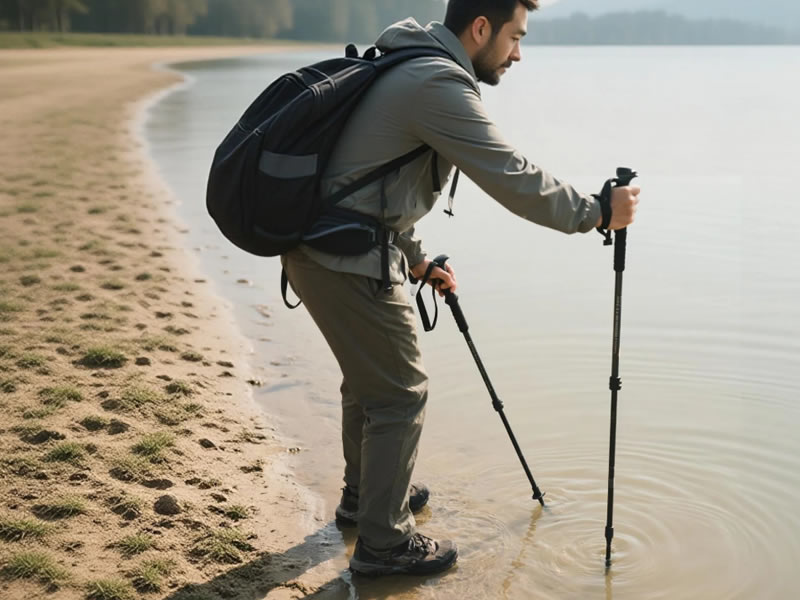
Technique 1: Testing Water Depth & Bottom Composition
This is essential for safe stream or pond crossings.
- The Solid Plant: Facing upstream or sideways, plant your pole firmly into the water at the spot where you intend to step. Do this at a slight angle for better leverage.
- Feel for Depth: Lower the pole until it meets resistance. Note how much of the shaft submerged. Is it knee-deep? Thigh-deep? This is your primary depth check.
- Assess the Bottom (The Crucial Step): Don't just hit bottom and stop. Apply gentle pressure and wiggle or probe the tip.Solid Rock/Gravel: You'll feel a firm, unyielding stop. You may hear/feel a scraping sound.Silt or Deep Mud: The pole will sink further with pressure, sometimes feeling "sucky" or offering no firm purchase. This indicates a hazardous, unstable bottom.Uneven or Rocky: You'll feel bumps and shifts. This may be stable but requires careful foot placement.
- Test Your Path: Probe a series of points along your intended crossing route. A deep or mucky spot between two shallower areas is a trap.
Technique 2: Testing Ground Stability
This applies to muddy trails, boggy ground, snow-covered terrain, or areas with hidden holes.
- The Tap Test (For Voids & Hollows): Before stepping, tap the ground firmly with the tip of your pole. Listen and feel.Solid Ground: A dull, firm thud.Hollow or Unsupported Ground (e.g., over a rodent hole, under a root mat): A distinctly different, hollow sound or a feeling of the surface giving way slightly. This is a major red flag.
- The Pressure Test (For Load-Bearing): After the tap, apply gradual, increasing downward pressure as if you were starting to lean on the pole.Stable Ground: The pole tip stays put, offering solid resistance.Unstable Ground (e.g., deep mud, rotten log, loose scree): The pole continues to sink, shifts sideways, or the surface crumbles. This indicates it cannot support your weight.
- The Angled Probe (For Perimeter Testing): If you suspect an unstable area (like the edge of a trail or a snow cornice), probe at an angle from a position of safety to see where firm ground ends.
Universal Best Practices & Safety Rules
- Maintain Three Points of Contact: Always keep at least two poles and one foot, or two feet and one pole, on stable ground. Never commit your full weight to a foot placement until the pole has confirmed its stability.
- Use a Wide Stance: When testing, spread your weight for better balance in case the ground gives way.
- Trust the "Worst-Feeling" Result: If one probe feels firm but the next feels terrible, trust the bad result. Conditions can change over inches.
- Angle is Your Friend: A pole planted vertically can puncture through a weak surface layer. A pole planted at an angle is more likely to skim and detect a lack of support without plunging through.
- Work Methodically: Don't rush. Systematic probing is faster in the long run than recovering from a post-hole or a fall.
Equipment Considerations for Optimal Probing
- Pole Material: Aluminum poles (especially 7075 alloy) are superior for this. They are strong enough for significant leverage and won't suffer catastrophic failure from side pressure like carbon fiber might.
- Tips: Sharp, tungsten carbide tips are essential for biting into hard ground and ice. For soft mud or snow, a small basket can prevent the pole from sinking too deeply during the test.
- Locks: Ensure your lever locks are fully secure. A collapsing pole during a probe is dangerous.
The Mindset: Proactive, Not Reactive
The most effective use of this technique is proactive curiosity. Don't wait until the ground feels suspect underfoot. Use your poles to constantly "read" the trail ahead, especially in low-visibility conditions (fog, rain, snow) or when walking off-trail.
Final Verdict: Your First Line of Defense
Your hiking poles are your primary scouts. By learning to interpret the feel of a solid plant versus a sinking probe, and the sound of a firm tap versus a hollow thud, you gain a powerful ability to assess risk.
This skill transforms your poles from simple stability aids into essential safety tools for navigation. It allows you to move through complex terrain with greater confidence, keeping you dry, stable, and secure by letting you test the unknown from the safety of the known.


