


How to Hold Hiking Poles Correctly: A Guide to Efficiency and Comfort
Hiking poles are no longer just for serious mountaineers. They've become essential gear for day hikers, backpackers, and trail runners alike. But here's a secret many miss: simply having poles isn't enough. Knowing how to hold hiking poles correctly is the key to unlocking their full potential. Incorrect grip can lead to wrist pain, fatigue, and even injury, while proper technique will improve your stability, conserve energy, and protect your joints.
Recommended trekking pole purchase link: https://s.click.aliexpress.com/e/_c4M7OWaN
This comprehensive guide will walk you through the fundamental steps to ensure you're getting the most out of your poles on every trail.
Step 1: The Foundation - Adjusting the Pole Length
Before you even think about your grip, the pole must be the right length. An improperly sized pole forces your arms and wrists into an awkward position, negating all benefits.
- On Flat Ground: Stand upright with the tip of the pole on the ground. Your elbow should form a perfect 90-degree angle, with your forearm parallel to the ground.
- For Uphill Sections: Shorten your poles. A steeper incline requires a shorter pole to maintain that efficient 90-degree angle and prevent overreaching.
- For Downhill Sections: Lengthen your poles. This provides better support and control as you descend, reducing the impact on your knees and allowing you to lean back slightly for safety.
Most modern poles have telescopic adjustments, so make it a habit to tweak the length as the terrain changes.
Step 2: Mastering the Grip - It's All in the Wrist (Straps)
This is the most common mistake and the most critical correction. The power from your poles should not come from a tight fist; it should come from transferring force through the strap.
The Correct Technique:
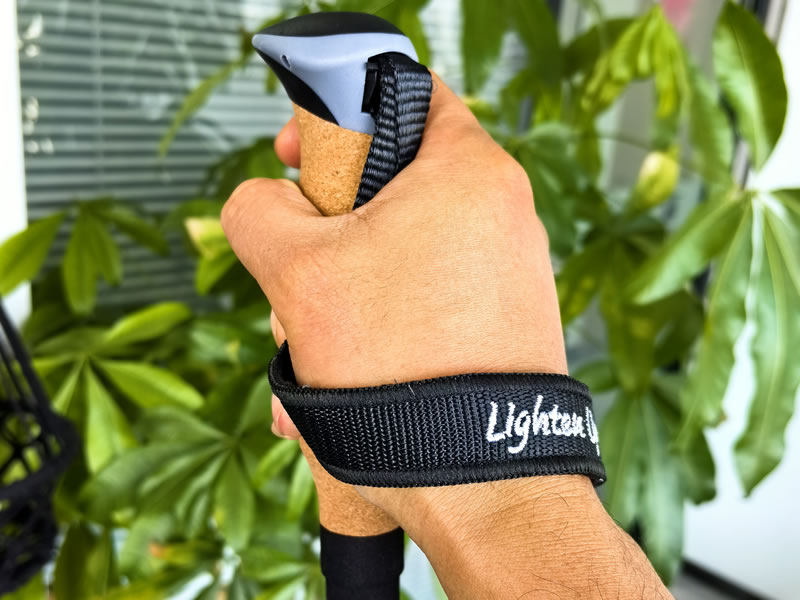
- Open the Strap: Locate the loop at the bottom of the strap.
- Hand Through the Loop: Slide your hand upwards through the loop from the bottom.
- Grip the Pole: Now, grip the pole handle. The strap should now be lying across your palm, running between your thumb and index finger.
- Secure the Strap: Close your hand comfortably over the strap and the grip.
Why This Works: This setup allows you to apply downward pressure on the pole by simply pushing through the palm of your hand into the strap, without needing to clench the grip tightly. On the backswing, you can relax your fingers almost completely, letting the strap cradle your hand. This prevents hand fatigue and cramping on long hikes.
Step 3: Proper Pole Planting and Arm Movement
Holding the pole correctly is one thing; moving it effectively is another. The motion should be natural and rhythmic.
- The "Opposite Arm, Opposite Leg" Rhythm: As you step forward with your right foot, your left pole should plant on the ground, and vice versa. This creates a stable, balanced tripod with every step.
- Plant the Pole in Front: Plant the pole tip slightly ahead and to the side of your leading foot, not directly beside it.
- Keep Elbows Close: Your elbows should stay relatively close to your body, swinging back and forth like a pendulum. Avoid wide, flailing arms.
- Apply Pressure: As the pole plants, lean forward slightly and apply pressure through the strap, using the pole to propel yourself forward. You are not just placing the pole; you are actively pushing off from it.
Advanced Tips for Specific Terrain
- Steep Uphills: Use a shorter pole length and plant the poles closer to your body, almost like you're "climbing" up the slope with your arms. Use a more forceful push to aid your ascent.
- Steep Downhills: Lengthen your poles and plant them slightly ahead of you. They act as outriggers, providing stability and absorbing shock. Lean back slightly and test the pole's placement before committing your full weight.
- Sidehilling (Traversing): Shorten the uphill pole and lengthen the downhill pole to maintain a level stance and better balance on a slope.
Conclusion: Grip Right, Hike Better
Mastering how to hold hiking poles correctly transforms them from mere accessories into powerful tools that enhance your hiking experience. By adjusting the length for the terrain, using the straps properly to transfer force, and maintaining a rhythmic planting motion, you will walk farther, feel more stable, and save your knees and legs from unnecessary strain.
So, before your next adventure, take a few minutes to practice in your backyard or a local park. Your wrists, knees, and future self will thank you for it. Happy trails


