


How to use wrist straps on hiking poles
If you're gripping your hiking poles like a hammer, you're missing one of their most critical features. The wrist straps are not mere safety loops to prevent you from dropping your poles; they are the fundamental mechanism for transferring power from your body to the trail. Properly understanding how to use wrist straps on hiking poles is what separates novice pole users from efficient, long-distance hikers. This guide will transform your technique, reducing hand fatigue and increasing stability.
Recommended trekking pole purchase link: https://s.click.aliexpress.com/e/_c4M7OWaN
Why the Strap is Your Primary Power Source
The human hand and forearm are not designed to maintain a tight, clenched grip for hours on end. Doing so leads to fatigue, cramping, and conditions like tendonitis. The genius of the wrist strap system is that it allows your skeletal structure and larger arm muscles to bear the load.
When used correctly, the strap enables a "push-pull" motion. You push down through the strap on the forward plant to propel yourself, and you relax your grip on the backswing, letting the strap cradle your hand. This cycle of engagement and rest is the key to enduring comfort.
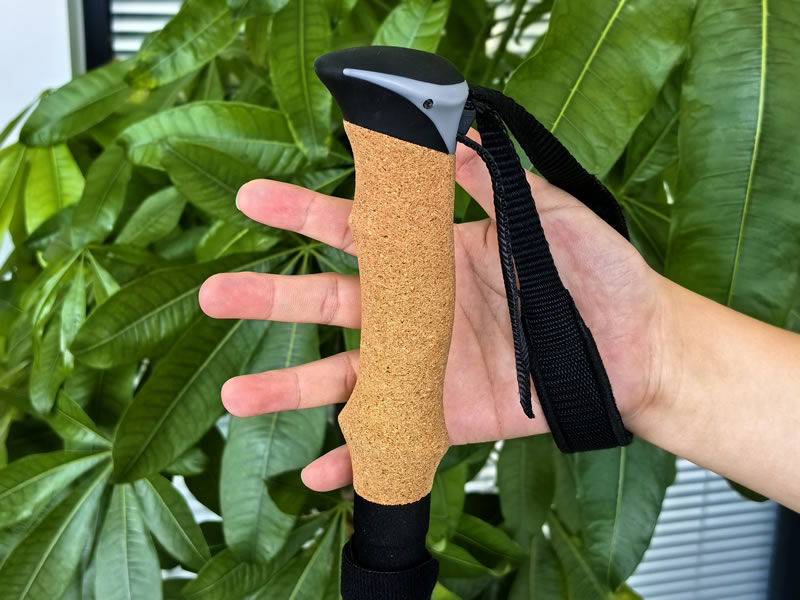
The Step-by-Step Guide to the Perfect Strap Technique
Follow these steps meticulously to ensure you are using your straps to their full potential:
- Locate the Loop: Find the bottom of the wrist strap. There is typically a defined loop or a seam where the strap connects to the pole's shaft.
- Slide Your Hand Upwards: This is the most counterintuitive yet crucial step. Do not put your hand through the loop from the top. Instead, slide your hand upwards through the loop from the bottom.
- Position the Strap Across Your Palm: After sliding your hand through, let the strap fall naturally. It should now run across the back of your hand and lie diagonally across your palm, from the webbing between your thumb and index finger down to the heel of your hand.
- Grip the Handle: Now, close your hand comfortably over the strap and the pole's grip. Your grip should be firm enough to guide the pole but relaxed—you should not be squeezing tightly.
- Secure the Adjustment: Most straps have a quick-adjust toggle. Slide this toggle up or down so that the strap fits snugly around your wrist. It should be tight enough that you can't easily pull your hand out, but not so tight that it restricts blood flow.
The "Feel" Test: A quick way to check your form is to plant a pole tip and push down. If you feel the pressure in your palm and the strap, you're doing it right. If you feel your forearm muscles straining and your knuckles turning white from gripping, you need to readjust.
Common Mistakes and How to Correct Them
- The "Dangling Loop" Mistake: Simply putting your hand through the top of the loop and letting it dangle from your wrist provides zero benefit and can be dangerous, as the pole will swing uncontrollably.
- The "Death Grip": Clutching the handle with all your might defeats the purpose of the strap. Remember, the strap is for pushing; the grip is for guiding.
- Ignoring the Adjustment: A strap that is too loose won't transfer power effectively. A strap that is too tight will be uncomfortable and can cause numbness.
Advanced Tips: Using the Strap for Different Terrain
- Uphill: On a steep climb, use a powerful push down through the strap with each plant. This engages your lats, shoulders, and back muscles to literally pull yourself up the hill.
- Downhill: The straps become crucial for bracing and shock absorption. As you plant the pole ahead, lean into the strap to control your descent and take significant weight off your knees.
- Fatigued Hands: If your hands are getting tired, you can even open your fingers completely on the backswing, letting the pole dangle securely from the strap before re-gripping for the next plant.
Conclusion: Stop Gripping, Start Pushing
Mastering how to use wrist straps on hiking poles is a simple adjustment that yields profound results. It transforms the poles from clumsy accessories into seamless extensions of your body. By shifting the workload from your small hand muscles to your larger upper-body frame, you conserve energy, prevent injury, and unlock a more efficient, powerful, and enjoyable hiking stride. On your next outing, focus on this technique—your hands, arms, and knees will feel the difference for miles to come.


