


How to Replace Hiking Pole Tips: A Complete Step-by-Step Guide
Worn-out hiking pole tips can compromise your traction and stability on the trail, and even damage your pole shafts. Knowing how to replace them is an essential maintenance skill for any hiker. This comprehensive guide will walk you through the entire process, from identifying when it's time for a change to installing new tips securely.
Recommended trekking pole purchase link: https://s.click.aliexpress.com/e/_c4M7OWaN
Signs You Need to Replace Your Tips
Recognizing when your tips are worn out is the first step. Look for these telltale signs:
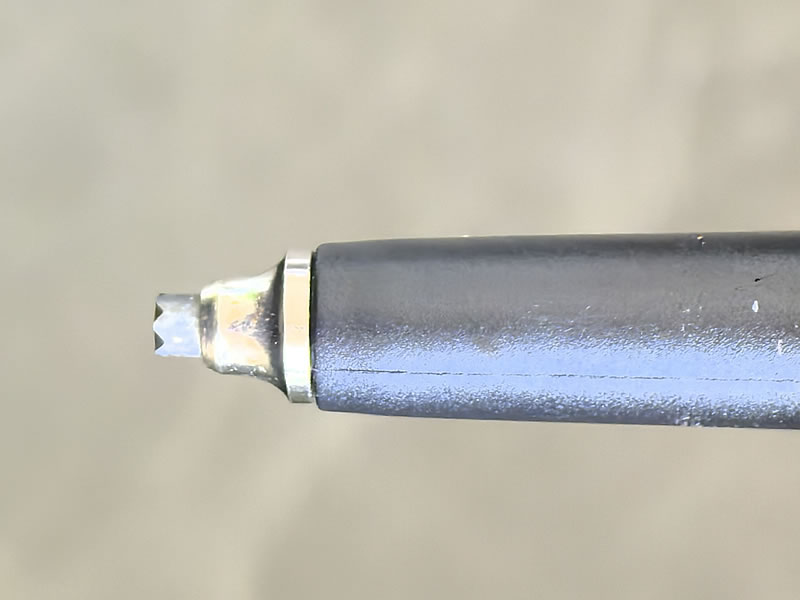
- The Carbide Tip is Gone: The hard, rough carbide steel insert is completely worn down or missing, exposing the smooth metal base underneath.
- Excessive Smoothing: The carbide tip is still present but has become smooth and rounded, losing its sharp, grippy edges.
- Visible Cracks or Damage: The rubber or plastic body of the tip is cracked, split, or feels loose on the shaft.
- Poor Grip: You find yourself slipping more often on rocks or hard surfaces, even when the tip looks somewhat intact.
Gathering Your Tools and Materials
Before you begin, have the following ready:
- Replacement Tips: Ensure they are the correct size for your pole brand and model (common sizes are "S" for small and "L" for large). Universal kits are often available.
- Pliers or Multi-Tool: A strong pair of pliers or locking pliers (e.g., VISE-GRIP) is invaluable for removing stubborn old tips.
- A Vice (Optional but Helpful): Securing the pole in a vice frees up both hands, making the process much easier.
- Rubbing Alcohol and a Rag: For cleaning the pole shaft before installing the new tip.
- Safety Glasses: To protect your eyes from any flying debris during removal.
Step-by-Step Removal Process
For Most Standard Tips:
- Secure the Pole: If you have a vice, gently clamp the pole shaft just below the old tip. If not, hold the pole firmly between your knees or have a friend steady it.
- Grip and Twist: Use your hands to firmly grip the old tip. Twist and pull simultaneously in a counter-clockwise direction. Often, a firm, steady pressure is all that's needed.
For Stubborn or Stuck Tips:
- Use Pliers for Leverage: Lock your pliers tightly onto the metal base of the old tip. Be careful not to crush the pole shaft itself.
- Apply Force: While holding the pole steady, use the pliers to twist and pull firmly. The added leverage should break the tip free. If it's extremely stuck, you may need to gently wiggle it from side to side while pulling.
For Permanently Fixed or Glued Tips (Less Common):
Some poles have tips that are not designed to be replaced. If the above methods fail and there is no visible retention ring or groove for the tip, you may need to cut the shaft just above the old tip and install a new one that uses a set screw. This is a more advanced repair.
Step-by-Step Installation Process
Once the old tip is off, installing the new one is straightforward.
- Clean the Shaft: Use the rag and rubbing alcohol to thoroughly clean the end of the pole shaft. Remove any old dirt, adhesive, or debris. A clean surface is crucial for a secure fit.
- Align the New Tip: Take your new replacement tip and ensure it's oriented correctly.
- Push and Twist: Firmly push the new tip onto the shaft while simultaneously twisting it clockwise. You should feel and often hear a "click" as the internal retention ring or grooves snap into place.
- Check the Fit: Give the tip a gentle pull to ensure it's securely attached. It should not come off easily or spin freely.
Special Scenarios and Pro Tips
- Using Adhesive: For added security on rough terrain, a small drop of epoxy or super glue inside the new tip before installation can create a semi-permanent bond. Note that this will make future replacements more difficult.
- Replacing Rubber Tips (Paws): These simply pull off and push on. If they are loose, a small piece of tape around the shaft can help create a tighter fit.
- Basket Replacement: While you have the tip off, it's a good time to check or replace your trekking baskets if they are worn. They typically slide onto the shaft before the tip is installed.
Testing and Final Checks
Before heading out on a hike, always test your new tips:
- Perform a visual inspection to ensure they are seated fully and evenly.
- Apply your body weight to the pole on a safe, hard surface to confirm the tip doesn't pop off.
- Practice a few planting motions to ensure everything feels secure.
Replacing your own hiking pole tips is a simple, cost-effective way to extend the life of your gear and ensure your safety on the trail. With the right tools and this guide, you can complete the job in minutes and get back to your adventures with confidence.


