


How to Store Hiking Poles When Not in Use on a Backpack
You've reached a flat, smooth section of trail, or perhaps you're facing a technical scramble that requires free use of your hands. Your trekking poles, once crucial for propulsion and balance, are now an encumbrance. Knowing how to securely and efficiently store them on your backpack is an essential trail skill. A poorly stored pole can snag on branches, fall out without you noticing, or unbalance your load. This guide will walk you through the most effective and secure methods for stowing your poles, ensuring they are safe, accessible, and ready for when you need them next.
Recommended trekking pole purchase link: https://s.click.aliexpress.com/e/_c4M7OWaN
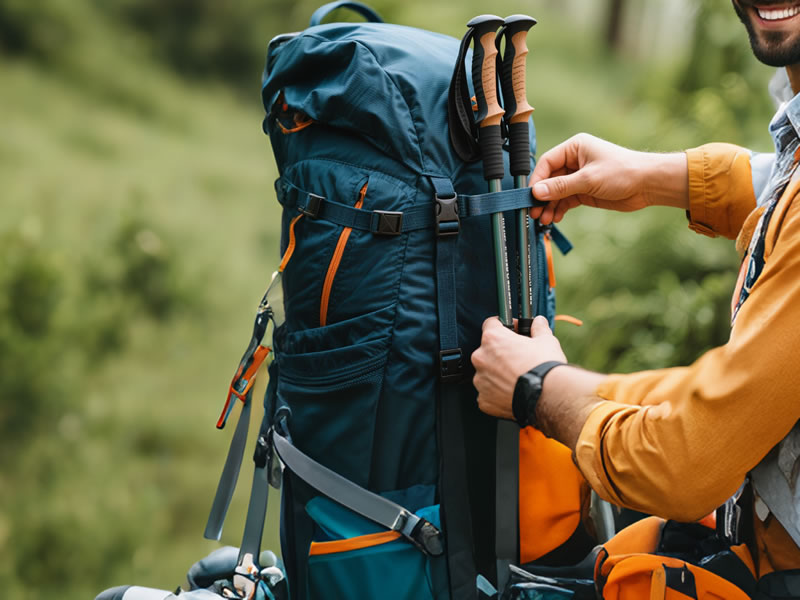
Method 1: The Vertical Side Attachment (The Gold Standard)
This is the most common, secure, and recommended method, utilizing your backpack's side compression straps.
Step-by-Step Guide:
- Collapse and Combine: Fully collapse all segments of your poles. Hold both poles together, aligning the grips and tips.
- Secure the Bundle: Use the built-in pole strap or a small reusable rubber band to bind them together. This prevents them from splaying apart.
- Position on Pack: Hold the bundled poles vertically against the side of your backpack, with the tips facing downward and the grips level with or slightly above the top of the pack.
- Fasten with Straps: Loosen the side compression straps. Wrap the straps around the poles at two or three points—near the top, middle, and bottom of the bundle. Cinch the straps tightly until the poles are held firmly against the pack and cannot slide up or down.
- Secure the Tips: Ensure the sharp tips are tucked safely within the profile of the pack or are covered with their rubber caps to prevent them from snagging on vegetation or accidentally poking someone behind you.
Why it Works: This method keeps the poles' weight close to your back and centered, maintaining good pack balance. It's also incredibly quick to deploy and retrieve.
Method 2: The Diagonal Front Attachment (For Quick Access)
Some modern packs feature horizontal daisy chains or ice tool loops on the front, designed for this very purpose.
Step-by-Step Guide:
- Prepare the Poles: Collapse them fully and bundle them together.
- Tip-Up Orientation: Place the grip ends into the ice tool loop or a secure point high on the pack's front shoulder strap.
- Diagonal Secure: Let the poles hang diagonally across the front of your pack. Use the lower compression straps or bungee cords on the pack's front to secure the tips.
- Check Mobility: Ensure the configuration doesn't interfere with your arm movement or your ability to look down at your feet.
Why it Works: This places the poles in a highly accessible location, perfect for terrain where you need to frequently switch between using and storing them. It also frees up the sides of your pack for other gear.
Method 3: Horizontal Attachment (Under the Lid)
Many overnight packs have attachment points specifically for carrying skis or poles horizontally.
Step-by-Step Guide:
- Bundle and Place: Collapse and bundle your poles. Place them horizontally across the top of your main pack bag, just below the lid.
- Secure with Lid Straps: Fold the pack's lid over the poles, then run the lid's buckled straps directly over the poles and fasten them. You may need to loosen these straps significantly first.
- Anchor the Ends: Use side compression straps to prevent the poles from shifting side-to-side.
Why it Works: This is an extremely secure method that perfectly centers the load. It's ideal for long, uninterrupted stretches where you won't need the poles for a while.
Pro Tips and Critical Mistakes to Avoid
- Cover the Tips: Always use the rubber tip covers. If they're lost, a few wraps of duct tape can prevent the sharp carbide tips from shredding your pack's fabric.
- The "Grip-Up" Hazard: Never store poles with the grips facing down and tips up. The grips can easily catch on low-hanging tree branches or rock overhangs, violently pulling you backward.
- Avoid External Shock Cord: Do not simply rely on a single bungee cord across the front of your pack. This is not secure and is a common reason for lost poles.
- Check Stability: After storing your poles, give your pack a slight shake. If the poles rattle or shift noticeably, re-tighten the straps. Get in the habit of visually checking your poles are secure at every break.
Conclusion: A Place for Everything
Mastering these storage techniques is as important as mastering the use of the poles themselves. By securely attaching your poles to your backpack, you free up your hands for photography, navigation, scrambling, or simply enjoying a snack, all with the confidence that your essential gear is safe, organized, and ready for the next challenging ascent or knee-pounding descent. A well-stowed pole is a testament to a prepared and efficient hiker.


