


How to shorten hiking pole straps
Trekking pole straps are fundamental to proper technique, allowing you to transfer weight through your arms without constantly gripping the handles. However, excessively long straps can undermine their purpose, creating a clumsy, inefficient, and sometimes unsafe experience. A strap that is too long forces you to over-grip the handle to maintain control, leading to hand fatigue and reducing the pole's effectiveness. This comprehensive guide will walk you through multiple methods to achieve the perfect strap length, enhancing both your comfort and performance on the trail.
Recommended trekking pole purchase link: https://s.click.aliexpress.com/e/_c4M7OWaN
Understanding the Importance of a Proper Fit
Before making any adjustments, it's crucial to understand why strap length matters. A correctly sized strap forms a secure loop around your wrist, allowing you to relax your grip while maintaining full control of the pole. When you plant the pole, you should be able to push down through the strap using the palm of your hand, not your fingers. An improper fit compromises this biomechanical advantage, turning your poles from efficient propulsion tools into simple balancing sticks.
Method 1: The Quick Adjust (No Tools Required)
This is the simplest and most reversible method, ideal for temporary adjustments or testing your preferred length before making a permanent cut.
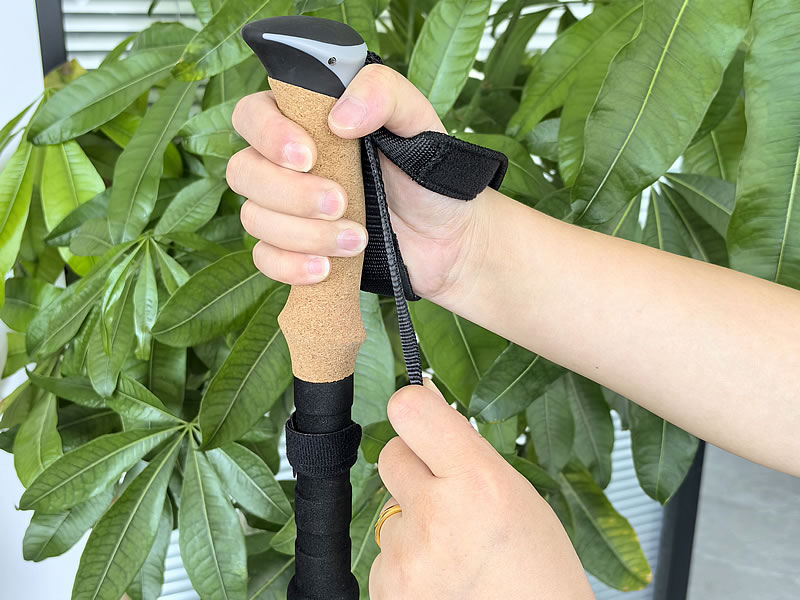
- Locate the Tri-Glide: Most hiking pole straps use a three-bar plastic slider, often called a tri-glide keeper.
- Undo the Default Setup: Pull the loose end of the strap up and out of the tri-glide, effectively releasing the tension.
- Create Your New Loop: Put your hand through the strap from below, then grip the handle as you normally would. The strap should rest comfortably across the back of your hand.
- Shorten the Strap: While holding the handle, pull the free end of the strap until it is snug but not tight. You should be able to slide your hand out easily without unbuckling anything.
- Re-thread the Tri-Glide: Feed the free end back through the tri-glide to lock the new length in place. Tuck any excess strap neatly away to prevent it from snagging on brush.
Method 2: Permanent Shortening (The "Cut and Seal" Approach)
If you've confirmed your ideal length and want a clean, permanent solution, this is the most effective method.
Tools You'll Need:
- Sharp scissors or a razor blade
- A lighter or candle
- A ruler or measuring tape
- Optional: Sewing kit or strong thread
Step-by-Step Guide:
- Determine the Correct Length: Use the Quick Adjust method to find your perfect fit. Mark the desired point on the strap with a pen or by making a small mental note of its position relative to the tri-glide.
- Remove the Strap: Detach the strap from the pole's handle. This is typically done by unlooping a sewn end from a plastic anchor or unbuckling a clasp. Consult your pole's manual if you're unsure.
- Measure and Cut: Lay the strap flat. Add an extra inch (2.5 cm) to your marked length for a safety margin and for creating a new end. Make a clean, straight cut.
- Seal the End: This is the most critical step to prevent fraying. Use the flame of the lighter to carefully melt the freshly cut end of the webbing. Move the strap slowly through the flame, allowing the synthetic material to melt and fuse. Caution: Do not hold it in the flame for too long, or it will burn and turn black. The goal is to melt it just enough to seal the fibers. Let it cool for a few seconds.
- Reinforce (Optional but Recommended): For added durability, sew a few stitches across the newly sealed end. This will prevent the melted seal from cracking and peeling over time.
- Reattach the Strap: Loop or buckle the newly shortened strap back onto the pole handle.
Method 3: The Fold-and-Stitch Technique
This is a great no-cut alternative that is semi-permanent and preserves the original strap length.
- Create a Fold: Using the Quick Adjust method, fold the excess strap back onto itself.
- Secure the Fold: Use a few strong, hand-sewn stitches to secure the fold in place. Create a small "tunnel" of stitches that holds the fold without making the strap too stiff.
- Test and Refit: Reattach the strap to the pole and test the fit. The folded section should sit comfortably against your wrist.
Pro Tips for the Perfect Fit
- Test Before You Cut: Always use the quick-adjust method on a short hike before making any permanent alterations. Your preferred length might change with different gloves or terrain.
- The Goldilocks Zone: The strap should be tight enough that you can open your hand without dropping the pole, but loose enough to allow full blood circulation. You should be able to slide a finger or two easily between the strap and your wrist.
- Consider Terrain: Some hikers prefer a slightly shorter strap for steep uphill sections for more leverage and a slightly longer one for descents for better control. The quick-adjust method is perfect for this.
- Check Both Sides: Ensure both straps are adjusted to the same length for symmetrical movement and comfort.
Conclusion: A Small Adjustment for a Major Upgrade
Taking the time to properly shorten your hiking pole straps is one of the easiest and most impactful gear modifications you can make. It transforms the user experience from one of constant, fatiguing grip to one of efficient, powerful propulsion. Whether you choose the quick, reversible fix or the permanent "cut and seal" method, you'll be rewarded with a more natural connection to your poles, reduced hand and forearm fatigue, and a more enjoyable, effective hike. Your poles will finally function as the powerful, trail-taming tools they were designed to be.


