


How to Use Walking Poles Correctly: A Masterclass in Technique and Efficiency
Walking poles are powerful tools that can transform your hiking experience, but their benefits are only fully realized when used with proper technique. Many hikers unknowingly compromise their efficiency and safety by using incorrect form. This comprehensive guide will walk you through the fundamental principles of proper pole usage, from basic setup to advanced techniques for varied terrain.
Recommended trekking pole purchase link: https://s.click.aliexpress.com/e/_c4M7OWaN
Step 1: The Foundation - Proper Pole Setup
Before you take a single step, correct setup is crucial:
- Adjusting Height: On level ground, your elbow should form a comfortable 90-degree angle when holding the pole with its tip on the ground. A common mistake is setting poles too long, which forces your shoulders into an unnaturally high position.
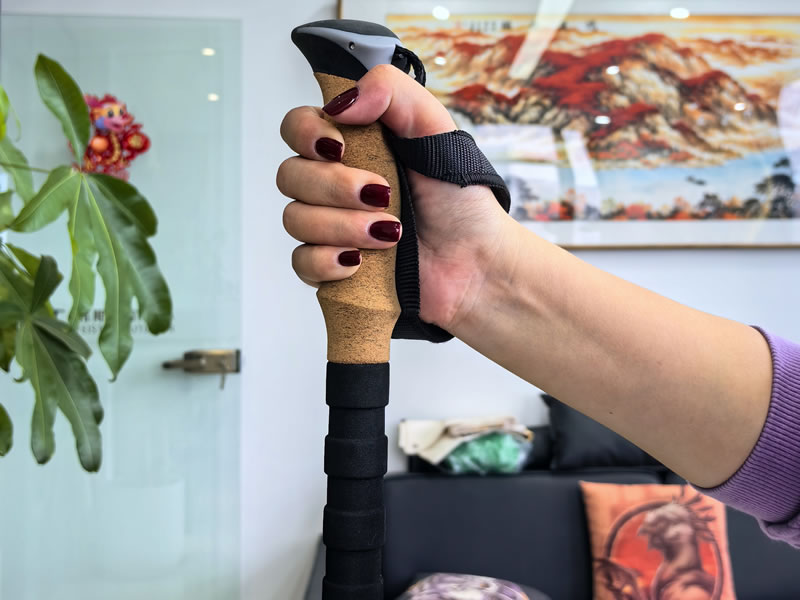
- Securing the Wrist Straps: This is often done incorrectly. Don't simply slide your hand through the strap. Instead, slide your hand upward through the bottom of the loop, then bring the strap across your palm and grip the handle. This creates a secure cradle, allowing you to transfer weight through your wrist bone instead of your grip strength.
Step 2: Mastering the Basic Technique
The core movement is a natural, rhythmic motion:
- The Rhythm: Establish a "right foot, left pole / left foot, right pole" pattern. This opposite arm and leg movement is the most natural and efficient rhythm, providing stability and a smooth, propulsive gait.
- The Arm Swing: Your arm should swing naturally from the shoulder, not the elbow. Imagine you're gently shaking hands with someone in front of you. The pole should plant at an angle, not straight up and down.
- The Plant and Push: Plant the pole tip firmly beside your front foot, not ahead of it. As your body moves forward, apply pressure through the wrist strap and push backward, using the pole to propel yourself. The power comes from this "push" phase, not just from placing the pole on the ground.
Step 3: Adapting to Different Terrains
Your technique should evolve with the landscape:
- Uphill: Shorten your poles. This allows you to maintain an upright posture and push effectively without overreaching. Take smaller, more powerful steps and focus on planting the pole level with or just behind your forward foot.
- Downhill: Lengthen your poles. This enables you to plant the tips securely ahead of you, providing stability and acting as a "brake" to reduce impact on your knees. Lean back slightly and keep your weight over your feet.
- Side Hills: Use the uphill pole for primary support, planting it slightly ahead and above you. Shorten the downhill pole for better contact with the sloped ground.
- Obstacles (Stream Crossings, Logs): Plant both poles firmly for a stable, three-point base of support before moving your feet. Test your footing before committing your full weight.
Step 4: Common Mistakes to Avoid
- "Planting Too Far Forward: This disrupts your balance and reduces propulsion efficiency.
- "Stabbing" the Ground: A smooth, swinging plant is more effective than a forceful jab.
- "Death Grip": Hold the grip lightly. The strap, not your clenched hand, should bear the load.
- Dragging Poles: Lift and plant each pole deliberately instead of letting them drag behind you.
Step 5: Integrating Poles into Your Hiking Rhythm
Correct pole use should feel fluid and become second nature. It engages your core, arms, and back, turning a lower-body activity into a full-body workout. This distributes effort more evenly, conserves energy, and can increase your hiking speed and endurance by up to 25%.
Mastering these techniques takes practice. Start on a flat, easy trail to build muscle memory before tackling more complex terrain. When used correctly, walking poles become an extension of your body—enhancing your stability, power, and connection to the trail with every step you take.


