


How to Fix a Frayed Seam or Webbing Loop on a Lighten Up Hammock?
Discovering frayed seams or webbing on your Lighten Up Hammock is a serious matter that directly impacts safety. While a professional repair service is always the gold standard, understanding how to address these issues in the field or at home can save your trip and extend your gear's life. Here’s a detailed, safety-first guide to diagnosing and repairing these critical failures.
Part 1: Safety Assessment & Initial Diagnosis
Before touching a needle, assess the damage:
- Minor Fraying: Loose threads on the surface of a seam or the very end of a webbing loop. The underlying structure feels solid.
- Moderate Damage: Visible separation of fabric at a seam or multiple broken threads in webbing, but the connection is still largely intact.
- Critical Damage: Significant separation, torn fabric where the seam attaches, or webbing that is frayed near a bar tack stitch (the box-and-X pattern securing the loop). This often requires full replacement.
If damage is critical, or if you have any doubt about your repair skills, STOP. Send it to the manufacturer or a professional gear repair shop.
Part 2: Repairing a Frayed Seam
A seam holds two panels of fabric together. Fraying here weakens the hammock body.
Tools Needed: Heavy-duty needle (sailmaker's or upholstery), high-strength polyester or nylon thread, scissors, seam ripper (optional), thimble.
Procedure:
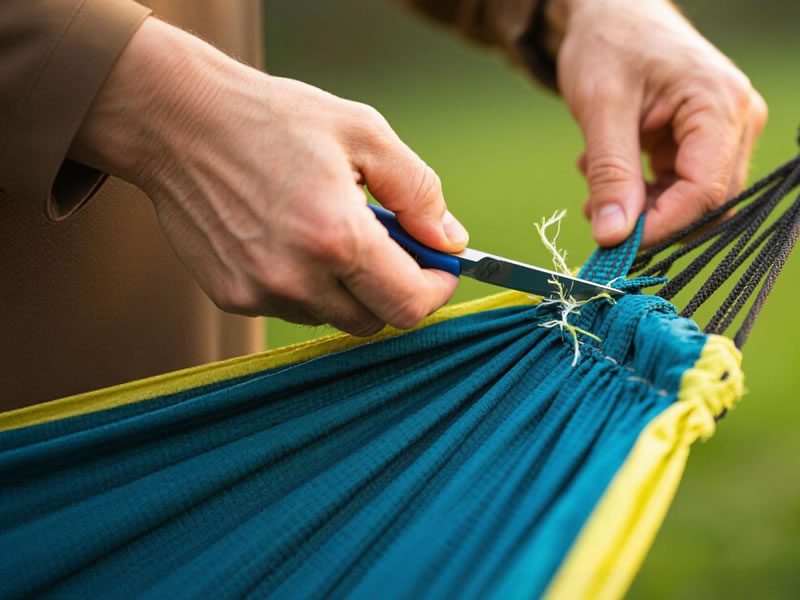
- Clean & Prep: Clean the area with rubbing alcohol and let it dry. If old stitches are broken, carefully remove them with a seam ripper to prevent further fraying.
- Reinforce with New Stitching: You will sew a new seam just inside the original, through both layers of fabric.Start with a backstitch for a strong anchor: push the needle through from the inside, leave a 2-inch tail, then go back through a stitch length behind. Pull tight.Use a simple, tight running stitch or backstitch along the entire length of the frayed section, staying about 1/8 inch inside the original seam line. Ensure each stitch is snug but doesn't pucker the fabric excessively.Every few inches, lock the stitch by making a small backstitch.Finish with another strong backstitch and tie off the thread with a secure knot on the inside of the hammock.
- Post-Repair: Trim excess thread. Apply a small amount of seam grip or a flexible fabric glue to the knot and the final stitch on the inside to prevent unraveling. Test the repair with gradual, increasing hand pressure.
Part 3: Repairing a Frayed Webbing Loop
This is higher-stakes, as webbing bears your full weight. Most failures occur at the sewn bar tack.
Tools Needed: Lighter, scissors, heavy needle & thread, high-strength webbing (if replacing), sewing machine (strongly recommended for bar tacks).
A. For Minor Fraying at the Cut End (Not Near Stitches):
- Use a lighter to carefully melt the frayed synthetic fibers into a smooth, solid bead. Avoid charring.
- Once cool, sew a simple box stitch (a square with an X through it) about 1/2 inch from the melted end to prevent future fraying and reinforce the melt.
B. For Fraying or Damage at the Bar Tack (The Critical Joint):
This is a potential point of catastrophic failure. A hand-sewn repair is a field fix only.
- Do Not Remove Old Stitching: It still provides some strength.
- Reinforce Over the Top: Using a heavy needle and thread, meticulously sew a new bar tack pattern directly over the old, damaged one. You must replicate the box-and-X pattern with extremely tight, dense stitches. This is difficult by hand.
- The Professional/Home Machine Method (Recommended):Use a seam ripper to completely remove the old bar tack stitches.Fold the webbing to recreate the original loop, ensuring no twists.On a heavy-duty sewing machine with a size 16-18 needle and polyester thread, sew a minimum of 12-15 rows of tight zig-zag stitches in a rectangular pattern, completely covering the area of the old bar tack. This is the only truly reliable method.
C. Complete Loop Replacement (Safest Option):
If the webbing is damaged along its length or the loop is compromised, replacing it is best.
- Purchase a new, rated continuous loop or make one from tubular webbing.
- Remove the old loop by cutting it off, leaving the original channel intact.
- Thread the new loop through the hammock end channel and secure it with a water knot (for tubular webbing) or a double fisherman's bend (for cord). Leave long tails and carefully melt the ends.
Final Stress Test & Wisdom
After any repair, you must conduct a rigorous test:
- Hang the hammock low over soft ground.
- Apply gradual weight: first your hands, then knees, then full sitting weight, and finally full lying weight.
- Listen for any concerning sounds and visually inspect the repair under load for stretching or separation.
Remember: Your safety is suspended by these points. A field repair on webbing should be considered temporary. For permanent peace of mind, especially for critical load-bearing components, sending your Lighten Up Hammock to a professional gear repair service is the wisest investment. They have the industrial machines and expertise to restore factory-level strength, ensuring your adventures remain safe and secure.


