


Carabiner Dimensions for a 1-Inch Webbing Loop: Ensuring a Safe and Functional Fit
When connecting a 1-inch webbing loop—common in slings, anchor systems, dog leashes, and gear tethers—to a carabiner, choosing the correct dimensions is not merely about fitting it through the gate. It is a critical safety and performance decision. An improperly sized carabiner can drastically reduce the system's strength, damage your gear, and increase the risk of failure. This guide breaks down the precise dimensional considerations to ensure a secure and efficient connection.
Recommended trekking pole purchase link: https://s.click.aliexpress.com/e/_c4M7OWaN
The Golden Rule: It's About the Basket, Not Just the Gate
The most common mistake is focusing solely on whether the webbing can be forced through the gate opening. The primary safety concern is where the webbing sits when under load. The goal is for the webbing to rest securely in the carabiner's basket (the curved, solid spine opposite the gate), not be squeezed against or cross-load the gate.
Critical Dimensional Metrics
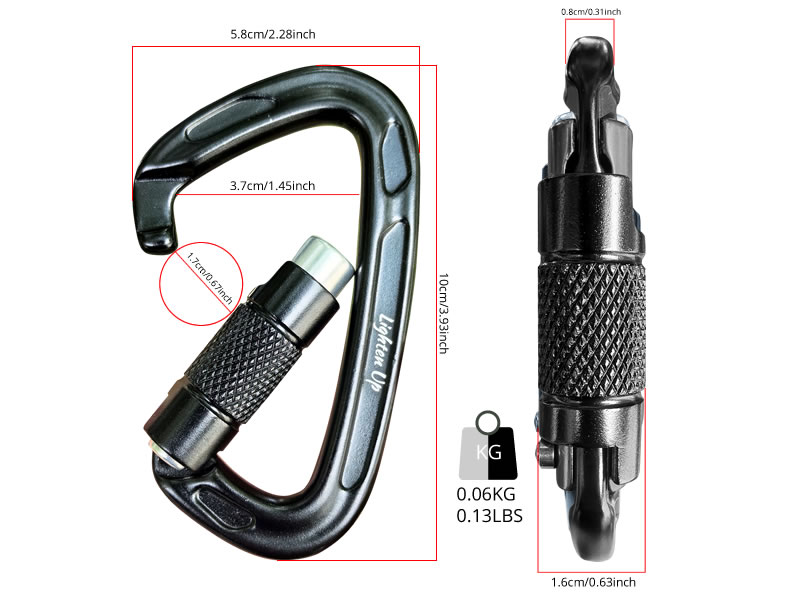
For a 1-inch (25.4mm) webbing loop, evaluate these three carabiner dimensions:
- Gate Clearance (Opening Width):Minimum: The gate opening must be significantly wider than 1 inch to allow easy, non-binding clipping and unclipping, especially with a doubled-over loop.Recommended: A gate clearance of at least 1.25 inches (32mm) is ideal. This provides a margin for the webbing's thickness, prevents pinching, and facilitates one-handed operation.
- Basket Clearance (Internal Width/Curve Radius):This is the most important dimension. This is the space between the inside of the spine and the inside of the gate when closed.Requirement: The basket must be wide enough for the 1-inch webbing to lie flat against the spine without being pinched at the sides or forced to twist. A carabiner with a narrow, V-shaped basket will choke the webbing, creating a point of undue stress and wear.Look for: Carabiners with a broad, generously curved basket. A pear-shaped (HMS) carabiner is explicitly designed for this, offering the widest, most accommodating basket.
- Internal Length (Major Axis Length):Consideration: While less critical than width, the internal length determines how much of the webbing loop is in contact with the carabiner. A longer internal space is beneficial if you need to clip multiple items (e.g., a webbing loop and a rope) into the same carabiner without them interfering with each other or jamming the gate mechanism.
The Consequences of a Poor Fit
- Cross-Loading: If the carabiner's basket is too narrow, the webbing can force the gate sideways. A carabiner cross-loaded on its minor axis can have its strength reduced by 65-70%, a catastrophic risk in climbing.
- Gate Abrasion and Wear: A tight fit causes constant friction between the webbing and the gate, potentially damaging the webbing's fibers and prematurely wearing the carabiner's gate mechanism.
- Difficulty of Use: A carabiner that is a struggle to clip and unclip discourages proper technique and safety checks.
Recommended Carabiner Types and Sizes
For safety-critical applications (climbing, rigging), always use a locking carabiner.
- Best Choice: Pear-shaped (HMS) Carabiner:Why: Its defining teardrop shape provides the widest possible basket, specifically engineered to accommodate a bulky knot (like a Munter hitch) or, in this case, wide webbing. It allows the 1-inch loop to sit perfectly without distortion.Example Dimensions: A typical HMS carabiner will have a gate opening of ~30mm and a wide, curved basket exceeding 25mm in internal width.
- Excellent Alternative: Asymmetric D-Shaped Carabiner:Why: The D-shape is designed to keep loads centered on the strong spine. An asymmetric D, with a slightly curved gate, offers more basket room than a standard symmetric D. Ensure the flat spine section is long and wide enough for the webbing.
- Avoid: Small, Symmetric Ovals or Narrow D's:These often have insufficient basket width, forcing the webbing into the corners and creating a pinching or cross-loading hazard.
Practical Checklist for Selection
- Test Before You Trust: Physically thread your 1-inch webbing loop through the candidate carabiner.
- Visualize the Load: Pull the webbing tight against the spine. Does it lie flat and straight, or does it bend at the edges?
- Check for Pinching: Is there visible space on either side of the webbing within the basket? It should not be a friction-tight fit.
- Operate the Gate: Ensure the gate opens and closes smoothly without the webbing obstructing its movement.
Conclusion: Prioritize Geometry Over Minimum Clearance
Selecting a carabiner for a 1-inch webbing loop is an exercise in applied geometry. The objective is to find a carabiner whose internal shape naturally cradles and supports the webbing under tension. Do not settle for a carabiner that merely "fits"; choose one that fits correctly.
By prioritizing a carabiner with a wide basket clearance (>1 inch) and a gate opening over 1.25 inches, you ensure the integrity of your webbing, preserve the full strength of your carabiner, and create a safer, more durable connection for any task. In safety systems, proper fit is not a detail—it is the foundation.


