


How to Tighten Loose Hiking Pole Sections?
A loose, slipping pole section is more than an annoyance—it compromises the stability and safety of your hike. When a pole unexpectedly collapses under load, it can lead to a stumble or fall. Fortunately, for most major brands, this common issue has a straightforward fix. The solution depends entirely on your pole's locking mechanism. This guide will help you diagnose the type and apply the correct repair.
Recommended trekking pole purchase link: https://s.click.aliexpress.com/e/_c4M7OWaN
Step 1: Identify Your Locking Mechanism
There are two primary systems; using the wrong tightening method can damage your poles.
- Lever Locks (e.g., Black Diamond's FlickLock, Komperdell's Speed Lock): A cam-action lever clamps a metal band around the shaft.
- Twist Locks (e.g., internal expansion locks): Rotating the upper section clockwise tightens an internal expander inside the lower shaft.
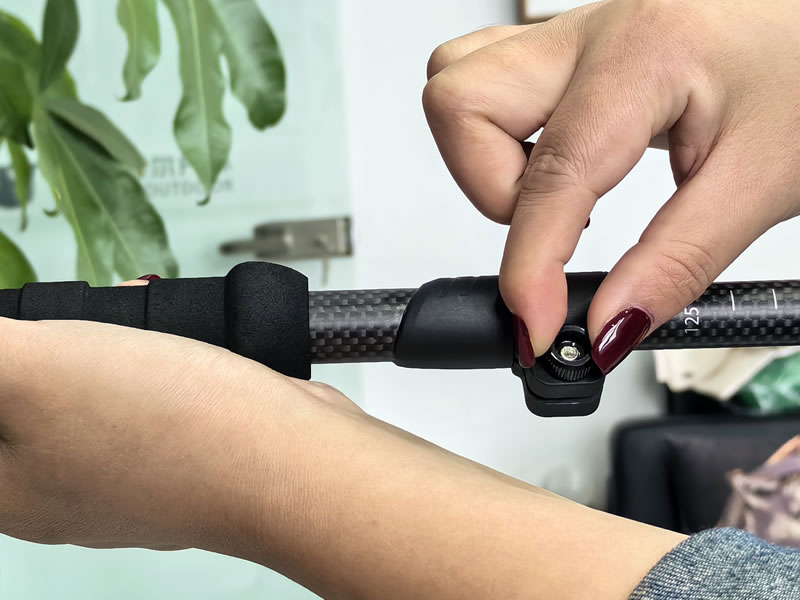
Step 2: Fixing Lever Locks (The Simple Adjustment)
Lever locks are designed for user adjustment. Looseness usually means the clamping mechanism needs a minor tightening.
Tools Needed: The small hex key (Allen wrench) provided with the poles, usually found in the grip compartment or included in the original box.
Procedure:
- Open the Lever: Fully release the locking lever to the "open" position.
- Locate the Adjustment Nut: Inside the now-open housing, you will see a small hexagonal nut.
- Tighten Incrementally: Insert the hex key and turn the nut clockwise by a quarter (1/4) turn. Avoid over-tightening, as this can make the lever impossible to close or strain the mechanism.
- Test: Close the lever. It should require firm but manageable pressure to lock. Extend the pole section and apply weight to test. If it still slips, repeat with another eighth of a turn. The goal is a secure hold with a smooth lever action.
Step 3: Addressing Twist Locks (The Cleaning & Replacement Fix)
Twist locks rarely have an external adjustment. Looseness is almost always caused by one of two issues: dirt/debris or a worn internal expansion bushing.
Part A: The Deep Clean (First Attempt)
- Fully Disassemble: Unscrew the two pole sections completely.
- Clean the Male Shaft: Wipe it down with a clean, dry cloth.
- Flush the Female Shaft (Internal Mechanism): This is critical. Rinse the inside of the lower section with warm water, agitating it to dislodge compacted dirt and sand. Use a cotton swab to gently clean the internal threads.
- Dry Thoroughly: Let all parts air-dry completely for 24 hours.
- Reassemble and Test: The removal of grit alone often restores friction and tightness.
Part B: Replace the Expansion Bushing (Permanent Fix)
If cleaning fails, the soft plastic expansion bushing inside the female shaft is worn out. This is a common wear item.
- Purchase the Correct Kit: Brands like Leki and Black Diamond sell specific replacement bushing kits for their twist-lock models. You need your pole's model name.
- Remove the Old Bushing: Using a small hook tool, tweezers, or a carefully inserted screwdriver, pry the old, often white or black, plastic bushing out of the lower shaft's interior.
- Insert the New Bushing: Press the new bushing firmly into the same groove until it seats evenly.
- Reassemble: Screw the sections together. The fresh bushing will expand against the inner wall when twisted, restoring a snug, secure fit.
Critical Dos and Don'ts
- DO use the correct tool for lever locks. An improvised tool can strip the nut.
- DO perform adjustments in small increments.
- DO ensure poles are clean and dry before any repair attempt.
- DON'T over-tighten a lever lock. If the lever becomes extremely hard to close, you've gone too far; loosen the nut slightly.
- DON'T use lubricants like WD-40 on a slipping twist lock. This will worsen the problem by reducing friction.
- DON'T attempt to glue or tape a loose section. This is a temporary, unsafe hack that can lead to catastrophic failure.
When Tightening Isn't the Answer: Assessing for Damage
If the above steps don't work, inspect for physical damage:
- Stripped Threads: On twist locks, cross-threading or severe wear can ruin the threads, necessitating shaft replacement.
- Cracked Shaft or Housing: A hairline crack in the carbon fiber or aluminum will cause persistent failure and is a safety hazard. Replace the damaged section.
- Deformed Locking Ring/Band: If the metal band in a lever lock is bent, the entire lock assembly may need replacing.
Conclusion: Restoring Confidence with Every Click
A loose pole section undermines the very purpose of the equipment. By systematically identifying your lock type—performing a simple hex-key adjustment for lever locks or a diligent clean-and-replace routine for twist locks—you can reliably restore the solid, trustworthy feel of your gear. This maintenance not only saves money but also reinforces the essential hiker's ethos of self-reliance. With your poles locking securely once more, you can focus on the trail ahead, confident that your support is unwavering.


