


How to test climbing carabiner strength at home
Testing a climbing carabiner’s strength at home is risky, imperfect, and no substitute for lab certification. However, DIY methods can help identify critically compromised gear. Here’s how to assess your carabiners safely—and when to abandon testing and replace them outright.
Why Home Testing Is Flawed (But Sometimes Useful)
Professional UIAA/CE tests use hydraulic machines to apply dynamic loads (simulating falls) and cyclic fatigue tests. Home methods lack precision but can:
- Reveal catastrophic flaws (cracks, gate failure).
- Compare relative wear between carabiners.
- Educate climbers on force mechanics.
Never use DIY results to justify using suspect gear.
3 Semi-Reliable Home Test Methods
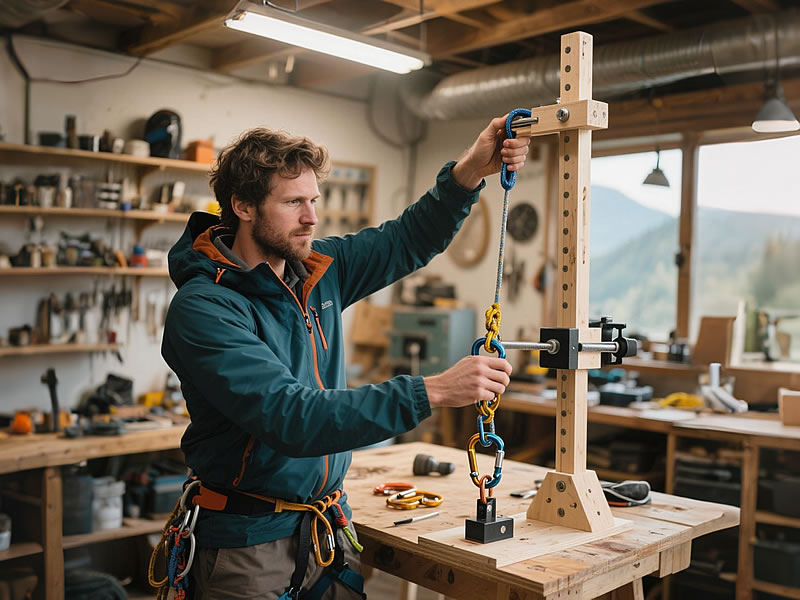
1. Static Load Test (Basic Strength Check)
Max Safe Load: 5 kN (1,125 lbs)
Steps:
- Secure the carabiner to a sturdy beam.
- Attach a known weight (e.g., calibrated gym plates) via a pulley.
- Gradually load up to 5 kN (≈500 kg).
- Check for deformation, cracks, or gate movement.
Limitations:
- Static ≠ dynamic force (real falls generate 3-12 kN).
- Risk of sudden failure—wear eye protection.
2. Gate Function Test (UIAA Minimums)
Tools: Fish scale (0-15 kg range), carabiner gate.
Steps:
- Hook the scale to the gate.
- Pull until the gate opens.
- UIAA standard: ≥6 kN gate-open strength.6 kN ≈ 1,350 lbs ≈ 612 kg.If your scale reads <15 kg to open, the gate is dangerously weak.
3. Visual/Sensory Inspection
- Magnification: Use a 10x loupe to check for micro-cracks near the nose or spine.
- Sound Test: Tap the carabiner with a metal key. A clear “ping” suggests integrity; a dull “thud” hints at internal cracks.
- Bend Test: Gently flex the carabiner (unloaded). Any creaking or resistance indicates fatigue.
When to Stop Testing and Replace
Abandon testing and retire the carabiner immediately if you observe:
- Visible cracks (even hairline fractures).
- Gate wobble >2mm side-to-side.
- Permanent deformation (e.g., spine bending).
- Corrosion pits deeper than 0.5mm.
Home Test vs. Lab Test: Key Differences
| Criteria | Home Test | UIAA Lab Test |
|---|---|---|
| Load Type | Static | Dynamic (fall simulation) |
| Precision | ±2-3 kN | ±0.1 kN |
| Cycle Testing | Impossible | 15,000+ gate cycles |
| Failure Analysis | Visual only | Microscopic/X-ray scans |
Real-World Failure Case
A climber tested a “questionable” carabiner at home with 4 kN weights—no issues found. Weeks later, it snapped at 8 kN during a lead fall. Lab analysis revealed internal corrosion invisible to DIY methods.
Expert Warning
“Home tests create false confidence. If you doubt a carabiner’s strength, replace it. Testing is for labs; climbing is for living.”—Jim Ewing, Metallurgist & Climbing Gear Designer
Safe Alternatives to Home Testing
- Professional Services:Send gear to UIAA-certified labs (cost: $50-100 per carabiner).Brands like Petzl offer discounted inspections for registered gear.
- Compare to New Gear:Test old and new carabiners side-by-side with identical loads.Noticeable differences (e.g., gate stiffness) signal wear.
- Community Resources:Many climbing gyms have load-test kits for educational demos.
The Bottom Line
While DIY tests can flag obvious red flags, they’re no match for professional evaluation. For climbers determined to try:
- Never exceed 5 kN.
- Wear protective gear.
- Film the test to review slow-motion failures.
Ultimately, replace, don’t test. A new carabiner costs less than an ER visit.


